Business & Tech Essentials
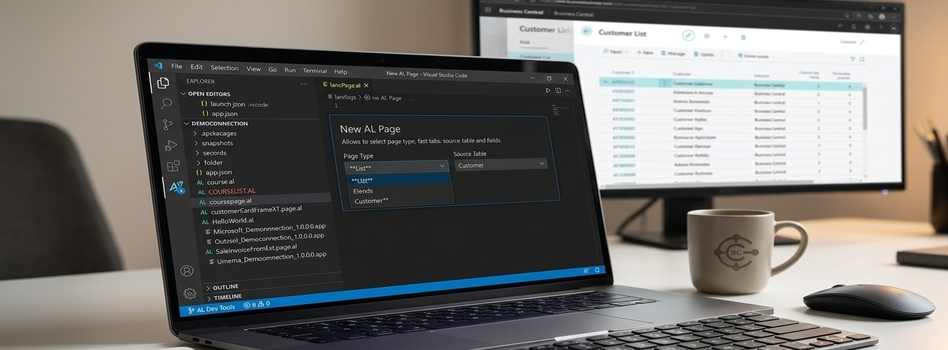
How to Create a List Page in Business Central Using AZ AL Dev Tools
Creating a custom page in Dynamics 365 Business Central can feel complicated when you are new to AL development. Fortunately, AZ AL Dev Tools provides a wizard that can make the process much easier by generating the basic AL code for you.
Need help with Business Central customization? Our Microsoft Dynamics 365 consultants can help you build custom pages and AL extensions tailored to your business needs.
In this guide, we will walk through how to create a simple List Page in Business Central using Visual Studio Code and AZ AL Dev Tools.
What Is AZ AL Dev Tools?
AZ AL Dev Tools is a Visual Studio Code extension designed to help Business Central developers work more efficiently with AL development.
It provides useful features such as:
- AL Wizard
- Symbol Browser
- AL Style Outline
- AL Preview
- Code actions
For beginners, the AL Wizard is especially useful because it can help generate the structure of a new AL object without writing everything manually.
What Do You Need Before Starting?
Before creating the page, make sure you have:
- Visual Studio Code installed on your computer.
- An AL development environment for Business Central.
- The AZ AL Dev Tools extension installed in Visual Studio Code.
Once everything is ready, we can start creating the page.
How to Create a List Page Using AZ AL Dev Tools
Follow these simple steps.
Step 1: Open Visual Studio Code
Open your Business Central AL project in Visual Studio Code.
If you have not installed AZ AL Dev Tools yet, install the extension before continuing.
Step 2: Open the AL Wizard
In the Visual Studio Code Explorer:
- Right-click in your project.
- Select New AL File Wizard.
- The AZ AL Wizard will open.
This wizard gives you different AL object options that you can create.
Step 3: Select Page
From the available object types, select Page.
The wizard can also be used for other objects, such as tables and page extensions, but in this example, we are creating a page.
Step 4: Add Page Details
Now provide the basic information for your page, including:
- Object ID
- Object Name
- Source Table
- Page Type
- Usage Category
For a list of records, select the appropriate List page type and choose the table that contains the data you want to display.
Then select Next.
Step 5: Select the Fields
The wizard will show the fields available from your selected source table.
Choose the fields you want users to see on the page.
For example, a course list might include:
- Course Name
- Duration
- Description
- Active
After selecting the required fields, continue to the next step.
Step 6: Review Your Fields
Check the selected fields and make sure the page contains the information you need.
If everything looks correct, continue with the wizard.
Step 7: Finish the Wizard
Select Finish.
AZ AL Dev Tools will generate the AL page code based on the information you provided.
This saves time because you do not have to create the complete page structure manually.
Step 8: Open the Generated Page
Open the generated .al file in Visual Studio Code.
Review the page name, object ID, source table, and fields. You can also make any changes you need before testing it.
Step 9: Run the Page
After making your changes, run or publish the AL project according to your Business Central development environment.
Then open Business Central and search for the page you created.
For example, if you created a Course List page, search for Course List and open it to verify that your records and selected fields are displayed correctly.
Why Use AZ AL Dev Tools?
When we are learning AL development, creating every object manually can take extra time. AZ AL Dev Tools provides a simple starting point by generating the basic structure for us.
It can be especially helpful when:
- You are new to AL development.
- You want to create objects faster.
- You want to reduce repetitive coding.
- You are building custom Business Central extensions.
Final Thoughts
Creating a List Page in Business Central does not have to be difficult. With Visual Studio Code, AL, and AZ AL Dev Tools, we can generate a basic page structure quickly and then customize it according to our business requirements.
If you are just starting with Business Central development, try the wizard with a simple table and gradually explore more AL objects and customization options.
See you next time with another Business Central topic.
Disclaimer: All logos, trademarks, and brand names used in this document are the property of their respective owners. Their use here is for identification purposes only and does not imply endorsement.
Recent News

How to Do Predictive Analysis in Power BI Desktop
07-08-2026

How to Navigate Department Documents in SharePoint
07-08-2026
How to Remove or Hide Posting Rights for Users in Dynamics 365 Business Central
07-08-2026
Power BI Mobile Application Features and Usage Guide
27-07-2026

ZATCA E-Invoicing Phase 2 Integration Explained
27-07-2026

Saudi Arabia's NCA Cybersecurity Guidelines
27-07-2026

Row-Level Security (RLS) in Power BI
27-07-2026

How to Use Power BI Copilot
20-07-2026

Microsoft SharePoint Deserialization Vulnerabilities: What Organizations Need to Know
15-07-2026
How to Add Fields in Business Central Using Customized Pages
13-07-2026

Your choice regarding cookies on this site
Policy, By Continuing, You are agreeing to Our Terms of Use and Consenting to the above.
Privacy Policy Powered By |