
Business & Tech Essentials
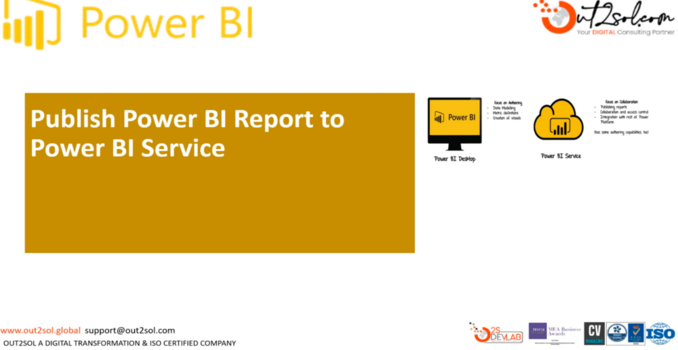
How To Publish Power BI Report to Power BI Service
Welcome to our next class on Power BI. In today's session, we will learn how to publish Power BI report to Power BI service in a simple and practical way. This class is designed for learners, professionals, and organizations who work with Power BI Desktop and want to share their reports online with their teams securely.
Note for Learners:
If your organization needs expert support in report management, workspace setup, or automation, explore our Power BI Consulting Services at Out2Sol Global. Our team helps businesses deploy and manage Microsoft Power BI environments efficiently.
In this class, we'll go step by step through the publishing process, from opening your Power BI file to uploading it into the Power BI Service. You'll also learn useful tips, precautions, and tricks to make the process smoother and avoid common publishing issues.
Why Publishing Power BI Reports Matters
Publishing a Power BI report to the Power BI Service allows you to share interactive dashboards and data insights with your entire organization. It converts your local file into a centralized online report that can be refreshed automatically, secured with permissions, and accessed from anywhere.
Once your report is live in the service, team members can collaborate, schedule data refreshes, and create dashboards from shared datasets. It's a key step in moving from individual analysis to team-wide decision-making.
Before You Start
Before you publish, make sure:
- You're signed in to Power BI Desktop with an account that has workspace access.
- Your dataset connections are valid and credentials are updated.
- You have a Power BI Pro or Premium license (required for shared workspaces).
- The file your publishing is finalized and saved properly.
Once you're ready, let's start with the step-by-step guide.
Step-by-Step Guide to Publish Power BI Report to Power BI Service
Watch: How to Publish Power BI Report to Power BI Service (Out2Sol Training Video)
Step 1 Open Your Power BI File
Launch Power BI Desktop and open the file you want to publish. Always save your file before publishing to ensure all your edits are included.
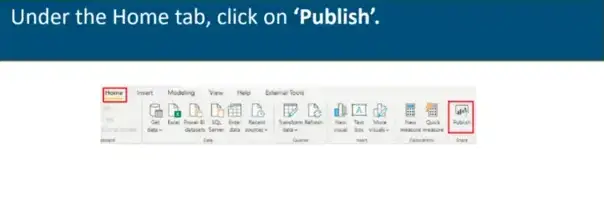
Step 2 Click on Publish
Go to the Home tab and click on Publish.
If you're not signed in, Power BI will ask you to log in using your Microsoft account credentials.
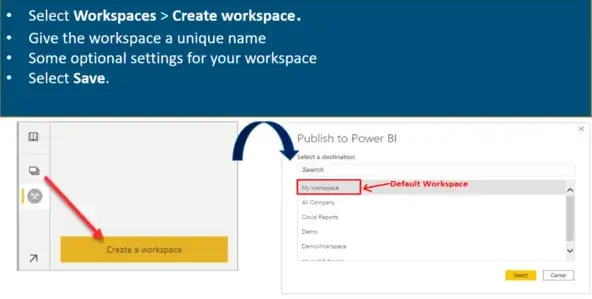
Step 3 Choose or Create a Workspace
After signing in, Power BI will ask where to publish your report. You can select:
- My Workspace (personal use)
- Shared Workspace (for teams)
If you don't have a shared workspace yet, click Create Workspace, give it a name, and assign permissions to your team members.
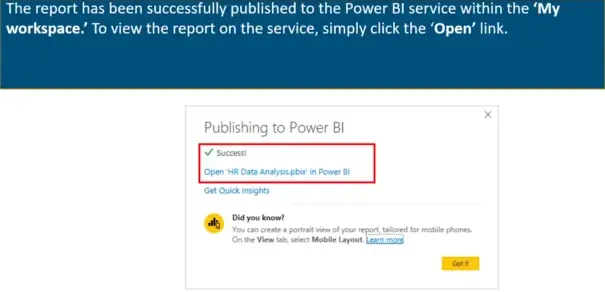
Step 4 Confirm the Successful Publication
Once your report is published, a message will appear confirming that it has been uploaded successfully.
Click Open [Report Name].pbix in Power BI to open it directly in your browser.
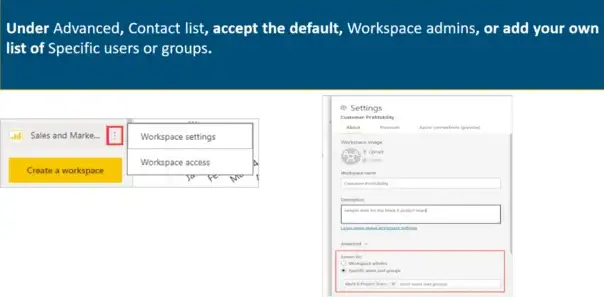
Step 5 Configure Workspace Settings (Optional)
Click on the ellipsis (...) next to your workspace name, and select Workspace Settings.
Here you can:
- Add or remove workspace admins
- Manage contact lists
- Adjust access permissions
Step 6 Upload PBIX File Directly (Alternative Method)
If you're unable to publish from Desktop, you can upload the report directly from the Power BI Service:
- Open your workspace.
- Click New > Upload > Browse.
- Select your .pbix file.
- Wait for the upload to complete.
This is especially useful when guest users or permission restrictions block direct publishing from Desktop.
Post-Publication Tasks You Should Perform
Once your report is live, perform the following checks:
Verify Dataset and Connection
- Go to Datasets > Settings in your workspace.
- Ensure all credentials are correct and the data sources are accessible.
- If needed, configure a data gateway for on-premises sources.
Set A Refresh Schedule
Keeping your data updated is essential. Under Dataset Settings, configure a scheduled refresh, daily or hourly, based on your needs.
Review Access Permissions
Make sure only authorized users can view or edit your report. Adjust permissions in the workspace settings if necessary.
Organize Reports into Apps
If you manage multiple reports, consider creating a Power BI App.
Apps provide a clean, user-friendly interface for viewers and simplify sharing across departments.
Tips, Tricks, And Precautions
Here are some classroom-tested methods that can make your publishing process smoother:
- Use Clear Names
Name your reports and datasets clearly (e.g., “Sales_Report_Q4_2025”) so teams can find them easily. - Always Save Before Publishing
Save your file to prevent half-uploaded or incomplete datasets. - Test Workspace Access
Publish once to a personal workspace to confirm report behavior before sharing with others. - Use Version Numbers
Maintain versions (like v1, v2) to avoid overwriting previous reports. - Check Refresh Logs Regularly
Go to Refresh History in the dataset to make sure your data updates are running smoothly. - Control Permissions
Limit who can publish reports to avoid unorganized workspaces. - Separate Development and Production Workspaces
Keep test and live environments separate. Move reports only after testing is complete.
Troubleshooting Common Issues
If your report doesn't publish correctly, check the following:
- Login Errors: Ensure you're signed in with the correct account.
- Duplicate Names: Rename your report if another with the same name exists.
- Gateway Issues: Configure an on-premises data gateway for local sources.
- Permission Conflicts: Confirm that you have publishing rights to the workspace.
If issues continue, save your PBIX file and re-upload it through the Power BI Service portal.
Practical Exercise for Students
To strengthen your learning, try this small exercise:
- Create a simple Power BI report using sample sales data.
- Save and publish it to My Workspace.
- Reopen it in Power BI Service and check visuals.
- Schedule a daily refresh.
- Create a new shared workspace, then republish your report there.
- Add one more team member and assign viewer access.
This activity will help you understand how publishing, permissions, and refresh work together.
Key Takeaways
Publishing your Power BI report to Power BI Service allows you to share your work with others, automate updates, and manage access easily.
By following these steps, saving your work, choosing the correct workspace, validating data connections, and setting refresh schedules, you can ensure your reports are both accurate and accessible.
Power BI Service is more than just a cloud destination; it's the bridge that connects your data insights with your team's decision-making.
Disclaimer: All logos, trademarks, and brand names used in this document are the property of their respective owners. Their use here is for identification purposes only and does not imply endorsement.


Your choice regarding cookies on this site
Policy, By Continuing, You are agreeing to Our Terms of Use and Consenting to the above.
Privacy Policy Powered By | ![]()


