
Business & Tech Essentials
Learn, Analyze, Empower
Videos for smarter business and data insights
Discover practical insights and daily learning content across key business applications like D365, Power BI, SharePoint, and more.
Enhance decision-making, boost collaboration, and stay ahead in today’s dynamic work environment.
Microsoft D365
Power BI
Share Point
BootCamp
TechX

Add Location on Cost Centre Dimension
Today we will learn how to add a location on the Cost Centre dimension in Dynamics 365 Business Central and how these dimension values can automatically appear in transactions like Transfer Orders and Purchase Invoices.
Dimensions in Business Central are very important for financial tracking and reporting. They help businesses organize transactions based on locations, departments, business units, projects, or branches. Instead of manually entering the same information again, dimensions make the process faster and more accurate.
If you are planning to improve ERP workflows, reporting, and automation in Business Central, explore Microsoft Dynamic Solutions to understand how the right setup can simplify daily operations and financial management.
What Are Cost Centre Dimensions in Business Central
Cost Centre dimensions are used to track expenses, operations, and transactions for specific branches, departments, or locations.
For example, if your company has multiple restaurant branches, warehouses, or offices, you can create separate dimension values for each location. This makes financial analysis much easier because every transaction is automatically linked to the correct cost centre.
This setup is commonly used in:
- Multi branch businesses
- Restaurant chains
- Retail companies
- Warehouse operations
- Enterprise financial reporting
Steps to Add Location on Cost Centre Dimension
Watch this quick tutorial to understand how location and business unit dimensions are configured inside Dynamics 365 Business Central.
Step 1 Search Dimensions
In the search bar, type Dimensions and open the Dimensions page.
Step 2 Open Cost Centre Dimension
Select the Cost Centre dimension.
Click on:
- Dimensions
- Dimension Values
This will open all available values under the Cost Centre dimension.
Step 3 Create New Dimension Value
Click New to create a new dimension value.
Now enter:
- Code → DUAL1
- Name → Applebee's and IHOP Bin Malik
This creates a new cost centre location for reporting and transaction tracking.
Step 4 Open Locations
Now search Location in Business Central.
Click New to create a new Location Card.
Step 5 Configure Location Details
Add the required details such as:
- Location Code
- Name
- Address
- Country Region
Once saved, this location becomes available in inventory and transfer transactions.
How It Works in Transfer Orders
Now go to Transfer Order.
You will notice that the Cost Centre code becomes available inside the Transfer Order setup.
When the transfer from location is selected, the related information automatically appears. This helps businesses maintain accurate inventory movement tracking between branches or warehouses.
Step 6 Open Business Unit Dimension
Search Dimensions again.
Now select the Business Unit dimension.
Click:
- Dimensions
- Dimension Values
Step 7 Create Business Unit Value
Click New and add:
- Code → BU_DUAL
- Name → Applebee's & IHOP
This creates a Business Unit dimension that can later be used in financial transactions and reporting.
How It Works in Purchase Invoices
Now go to Purchase Invoice.
You will see that the BU code is available automatically during transaction entry.
This helps ensure:
- Better reporting accuracy
- Consistent financial data
- Faster transaction processing
- Proper branch wise analysis
Why This Setup Is Important
Adding dimensions and locations in Business Central helps organizations manage operations more efficiently.
Some key benefits include:
- Better financial reporting
- Easier branch wise tracking
- Improved cost analysis
- Reduced manual entry
- Accurate inventory movement records
- Simplified audit and compliance processes
This setup becomes even more useful for businesses operating in multiple cities, warehouses, or franchises.
Important Tip
Business Central also supports:
- Default Dimensions
- Global Dimensions
- Shortcut Dimensions
- Dimension Combinations
- Value Posting Rules
These features help organizations control how dimensions behave during posting and reporting.
For stricter control, you can also set dimensions as Code Mandatory so users cannot post transactions without dimension values.
Final Notes
So today we learned how to add location values on Cost Center dimensions in Dynamics 365 Business Central and how these values can automatically appear in Transfer Orders and Purchase Invoices.
This is a simple but very useful setup for businesses that want organized reporting and better financial visibility across locations and departments.
Practice this setup in your own environment and you will better understand how dimensions improve transaction management inside Business Central.
See you next time with another Dynamics 365 Business Central topic.
Disclaimer: All logos, trademarks, and brand names used in this document are the property of their respective owners. Their use here is for identification purposes only and does not imply endorsement.
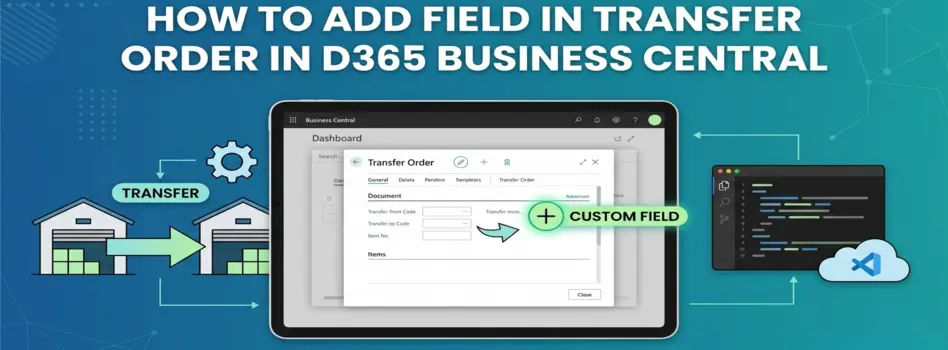
How to Add Field in Transfer Order in D365 Business Central
Today we will learn how to add a field in Transfer Order in Dynamics 365 Business Central using the personalize option and how it helps in managing additional information during inventory transfers.
This setup is useful when you want to quickly display additional fields without doing development. Instead of modifying the system, Business Central allows you to personalize the page and bring required fields into view. This helps improve visibility and makes daily operations easier.
If you want to implement proper customization or manage system-level changes, working with experts in Microsoft Dynamics Solutions can help you handle it the right way.
What Adding Field Means in Business Central
Adding a field using personalize does not create a new field. It only allows you to display already available fields on the page.
This means:
- You can show hidden fields
- You can rearrange fields
- You cannot create new data fields
This is useful for quick changes without affecting the system structure
Steps to Add Field in Transfer Order
Watch this quick video to understand how to add a field in Transfer Order step by step in real time.
Step 1 Search Transfer Order
- In the search bar, type Transfer Order and open it
Step 2 Open Personalize Option
- Click on Settings
- Select Personalize
Step 3 Enable Fields
- Click on the Field option
Step 4 Drag and Drop Field
- Select the required field
- Drag and drop it to your desired location
Step 5 Save Changes
- Click Done
Now your field is added successfully
How It Helps in Daily Work
Once the field is added, you can easily:
- View additional information directly on Transfer Orders
- Reduce the need to open multiple pages
- Improve data visibility for users
This makes inventory handling more efficient
Important Tip
Personalization only works for existing fields.
If you need:
- A completely new field
- Data storage in database
- Field in posted documents
Then you will need proper customization using development
Final Notes
So today we learned how to add a field in Transfer Order using personalize in Business Central.
This is a simple setup but very helpful in improving usability and saving time during daily operations.
Try this in your system and customize your Transfer Order screen as per your requirement.
See you next time with another Dynamics 365 topic.
Disclaimer: All logos, trademarks, and brand names used in this document are the property of their respective owners. Their use here is for identification purposes only and does not imply endorsement.

How to Set G/L Account as Default Line Type in Dynamics 365 Business Central
Today we will learn how to set G/L accounts as the default line type in Dynamics 365 Business Central for your sales and purchase invoices.
This setup is very helpful when you want to save time. Instead of manually changing the line type from "Item" to "G/L Account" on every single transaction, Business Central allows you to change the default setting, so it populates automatically. This reduces manual work and speeds up data entry.
If you want to set up dimensions correctly and avoid reporting issues later, working with a Microsoft dynamics 365 consultant can really help.
What Is the Default Line Type in Business Central?
By default, Business Central often assumes you are selling or buying items. If your business primarily deals with G/L accounts, you can change this behaviour. By updating the setup, every time you open a new invoice, the first column is already set to "G/L Account" without you having to click anything.
Steps to Set G/L Account as Default Line Type
Watch this quick video to understand how the default line type works in real time and how it applies automatically in invoices.
Step 1: Set Up Sales Invoices
- In the search bar, type Sales & Receivables Setup and open it.
- Find the Document Default Line Type field.
- Select G/L Account from the options.
Step 2: See How It Works in Sales Invoices
- Go to a new Sales Invoice.
- You will notice that the line type is automatically populated as G/L Account.
- This reduces manual work and ensures consistency.
Step 3: Set Up Purchase Invoices
- In the search bar, type Purchases & Payables Setup and open it.
- Find the Document Default Line Type field.
- Select G/L Account from the options.
Step 4: See How It Works in Purchase Invoices
- Go to a new Purchase Invoice.
- The line type will automatically appear as G/L Account here as well.
- This confirms that your setup is working across both sales and purchasing.
Why This Setup Is Important
- Saves time during daily data entry.
- Reduces manual clicks on every invoice line.
- Ensures consistency across your team.
Final Notes
So today we learned how to set G/L accounts as the default line type in sales and purchase invoices.
This is a small configuration, but it plays a big role in speeding up your daily operations. Practice this setup in your system and you will see how much time it saves.
See you next time with another Dynamics 365 topic.
Disclaimer: All logos, trademarks, and brand names used in this document are the property of their respective owners. Their use here is for identification purposes only and does not imply endorsement.

How to Set Default Dimensions for GL Accounts in D365 Business Central
Today we will learn how to set default dimensions for GL accounts in Dynamics 365 Business Central and how they automatically apply in sales and purchase invoices.
This setup is very helpful when you want consistent financial tracking. Instead of adding dimensions manually on every transaction, Business Central allows you to define rules so that dimensions are automatically applied whenever a GL account is used. This not only saves time but also improves reporting accuracy.
If you want to set up dimensions correctly and avoid reporting issues later, working with a Microsoft dynamics 365 consultant can really help.
What Are Default Dimensions in Business Central
Default dimensions allow you to assign specific dimension values to accounts. These values are automatically applied whenever that account is used in transactions like sales or purchase invoices.
For example, you can assign a Business Unit or Department to all GL accounts, so every entry is tracked correctly without manual input.
Steps to Set Account Type Default Dimensions
Watch Complete Video
Watch this quick video to understand how default dimensions work in real time and how they apply automatically in invoices.
Step 1 Search Dimensions
In the search bar,
- Type Dimensions and open it
Step 2 Open Account Type Default Dimension
- Select your dimension (for example Business Unit)
- Click on Account
- Type Default Dimension
Step 3 Select Table ID
- Choose Table ID
- Set ID as 15 (GL Account)
- Click OK
Step 4 Set Dimension Value and Rule
Now configure:
- Dimension Value Code (example BO)
- Value Posting → Code Mandatory
This ensures that a dimension value must always be used
How It Works in Sales Invoices
- Go to Sales Invoice
- Select type as GL Account
Once selected, you will notice that the dimension value is automatically populated This reduces manual work and ensures consistency
How It Works in Purchase Invoices
- Now go to Purchase Invoice
- Select GL Account
The same dimension (BU code) will automatically appear here as well This confirms that your setup is working across transactions
Why This Setup Is Important
- Ensures consistent financial data
- Reduces manual errors
- Improves reporting and analysis
- Saves time during data entry
Important Tip If multiple dimensions conflict, Business Central uses dimension priorities to decide which value to apply. Also, specific account-level dimensions can override general settings.
Final Notes
So today we learned how to set default dimensions for GL accounts and how they automatically apply in sales and purchase invoices.
This is a small configuration, but it plays a big role in maintaining accurate financial data and structured reporting.
Practice this setup in your system and you will see how much time it saves in daily operations.
See you next time with another Dynamics 365 topic.
Disclaimer: All logos, trademarks, and brand names used in this document are the property of their respective owners. Their use here is for identification purposes only and does not imply endorsement.
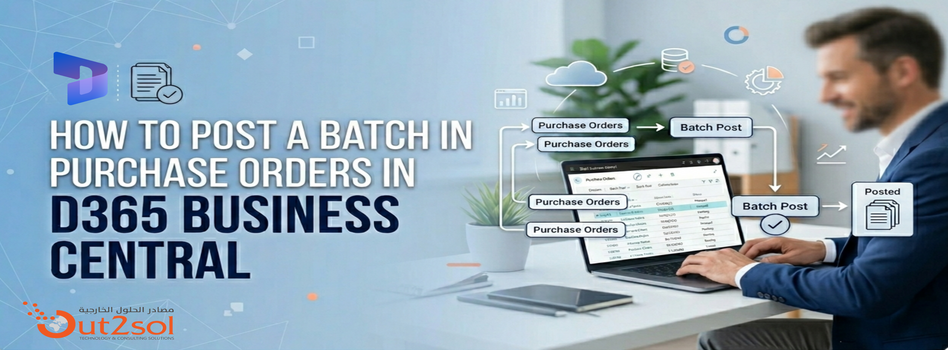
How to Post a Batch in Purchase Orders in D365 Business Central
Today we will learn how to post a batch in purchase orders or purchase invoices in Dynamics 365 Business Central. When you are working with multiple invoices daily, posting them one by one becomes time-consuming. That is where batch posting helps, allowing you to process multiple documents in a single action without repeating the same steps again and again.
To simplify batch processing and improve ERP performance, connect with a skilled Microsoft Dynamics 365 Consultant today.
What is Batch Posting in Business Central
In short, Batch posting is a built-in feature in Business Central that allows users to post multiple purchase invoices together instead of handling each document separately.
In real business scenarios, finance teams often deal with dozens of invoices at once. Using batch posting not only saves time but also reduces the chances of missing or delaying entries. It keeps your workflow consistent and faster, especially during closing periods.
Watch Complete Video
Watch this quick walkthrough to understand how batch posting works in real time inside Business Central.
Steps to Post a Batch in Purchase Orders
Step 1 Open Purchase Invoices
- Go to Purchase Invoices from the search bar
- Open the list of invoices
Step 2 Select Multiple Invoices
- From the list
- Select the invoices you want to post together
Step 3 Click on Post Batch
- Click on Post
- Then choose Post Batch from the options
Step 4 Confirm the Action
- A confirmation message will appear showing how many invoices will be posted
- Click Yes to continue
Step 5 System Processing
- Business Central will process all selected invoices in one go and show a completion message
- Click OK
Step 6 Verify Results
-
Go back to the invoice list and you will see that all selected documents are now posted
Things to Check Before Batch Posting
Before using batch posting, it is always a good practice to review your documents:
- Posting dates should be correct
- Required fields must be filled
- No validation errors in invoices
- User permissions should allow posting
This small check helps avoid errors during processing.
Final Notes
So today we learned how to post a batch in purchase orders in Business Central. It is a simple feature, but in real scenarios, it makes a big difference by saving time and keeping your work organized.
Try this in your system and see how it improves your daily workflow.
See you next time with another Microsoft topic.
Disclaimer: All logos, trademarks, and brand names used in this document are the property of their respective owners. Their use here is for identification purposes only and does not imply endorsement.

Set Up Default Account Numbers for BC Sales Invoices
In today’s Microsoft D365 class, we are going to learn how to configure Default Account Numbers in Dynamics 365 Business Central so that the correct company bank account automatically appears on sales invoices.
This setup is essential for organizations managing multiple bank accounts, multiple currencies, or different legal entities. Proper configuration ensures that customer payments are directed to the correct account without manual edits on every invoice. By the end of this quick session, you will clearly understand how the Business Central default bank account works and how to change the default bank on a BC invoice when needed.
If you need expert guidance in configuring Business Central or optimizing your ERP setup, connect with a professional Microsoft Dynamic 365 Consultant today.
Why Default Account Numbers Matter in Business Central
When creating a sales invoice in D365 Business Central sales invoice setup, the system pulls bank details from Company Information or from a bank account configured for a specific currency.
Without proper configuration:
-
The wrong bank account may print on invoices
-
Finance teams may manually correct invoices
-
Payment delays may occur
-
Multi currency handling becomes messy
Setting up Default Account Numbers ensures automation and accuracy.
How to Change Default Bank on BC Invoice
Follow these simple steps inside Dynamics 365 Business Central.
Watch Complete Video
Step 1: Search Bank Account
Use the search icon and type:
Bank Accounts
Open the relevant company bank account card.
Step 2: Open Bank Account Card
Inside the bank account card, verify:
-
Bank Account Code
-
Currency Code
-
SWIFT and IBAN details
This is where the Business Central company information bank setup connects with sales documents.
Step 3: Enable "Use as Default for Currency" Business Central
Locate the option:
Use as Default for Currency
✔ Enable this checkbox
This setting ensures that when you create a sales invoice in that currency, the system automatically selects this bank account.
This is especially important when configuring:
-
Dynamics 365 BC bank account for currency
-
Multi currency customer invoices
-
International transactions
Step 4: Sales Invoice Company Bank Account Code Automatically Populated
Now create a new Sales Invoice.
You will notice:
-
The Default bank account on sales documents is automatically filled
-
The correct bank account prints on invoice layout
-
No manual override needed
This confirms that your Business Central default bank account configuration is working correctly.
When Should You Use Multiple Default Account Numbers
You may configure different defaults when:
-
Company operates in multiple currencies
-
Separate bank accounts exist for SAR, USD, EUR
-
Different subsidiaries require different payment instructions
-
You want automatic bank selection per currency
This improves financial control and reduces posting errors.
Final Notes
So class, today we learned how to set up Default Account Numbers in D365 Business Central and enable the correct bank account to appear automatically on sales invoices.
This setup helps avoid manual changes and ensures accurate payment details.See you next time in another Microsoft D365 class.
Disclaimer: All logos, trademarks, and brand names used in this document are the property of their respective owners. Their use here is for identification purposes only and does not imply endorsement.

Opening Visual Studio Code from D365 Business Central for Extension Investigation
Modern D365 Business Central extension development is no longer limited to writing AL code from scratch. Microsoft has introduced smarter ways to inspect, investigate, and troubleshoot extensions directly from the Business Central web client by opening Visual Studio Code in context.
This capability is especially useful when developers, consultants, or support teams need to understand how a page works, which fields are used, or why an extension behaves unexpectedly. Instead of guessing, Business Central now allows you to jump straight into Visual Studio Code from the web interface and inspect the underlying AL structure.
Need help with extension investigation or enterprise-level customization?
Our team delivers secure and scalable Microsoft Dynamic 365 Solutions, covering development, debugging, and long-term support for Business Central environments.
What Does “Opening VS Code from Business Central” Mean?
Opening Visual Studio Code from Business Central does not mean editing live production code directly. Instead, it allows you to:
-
Inspect page and object definitions
-
Download symbols or source (based on permissions)
-
Attach a debugger to a running session
-
Understand how extensions interact with standard objects
This feature is designed for safe investigation and troubleshooting, especially in sandbox environments.
Who Should Use This Feature?
This workflow is useful for multiple roles:
|
Role |
How It Helps |
|
AL Developers |
Inspect pages, fields, and triggers faster |
|
Functional Consultants |
Understand page behavior without guessing |
|
Support Teams |
Troubleshoot extension issues efficiently |
|
System Administrators |
Investigate issues without direct code access |
If you are new to AL development, we recommend first reviewing our detailed setup guide on How to Connect Your Business Central with Visual Studio Code, as this blog builds on that foundation.
Prerequisites Before You Start
Before using the “Open in VS Code” feature, make sure the following are ready:
-
Visual Studio Code installed locally
-
AL Language extension enabled
-
Access to Business Central cloud sandbox or environment
-
Proper user permissions
-
Internet connection for symbol download and authentication
Without these, the investigation workflow will not function correctly.
Watch Out2sol Youtube Video on Extension Investigation
Step-by-Step: Opening Visual Studio Code from Business Central Web Client
Below are the exact classroom-style steps used in the Out2Sol training video.
Step 1: Search for a Customer
-
Use the Tell me what you want to do search
-
Type cus
-
Select Customer from the results
Step 2: Open Help Pane
-
Click the question mark (?) icon in the top-right corner
-
The Help pane opens on the right side
-
Scroll down
Step 3: Go to Help & Support
-
In the Other resources section
-
Click Help & Support
Step 4: Inspect Pages and Data
-
Locate the Troubleshooting section
-
Click Inspect pages and data
Step 5: Page Inspection Pane Opens
-
The inspection panel appears on the right
-
Displays page metadata, fields, and data sources
This pane is the bridge between the UI and AL code.
Step 6: Explore Page in Visual Studio Code
-
Inside the Page section
-
Click Explore page in Visual Studio Code
Step 7: Allow VS Code to Open
-
A confirmation dialog appears in VS Code
-
Allow the AL Language extension to open the URI
-
Click Open
Step 8: Inspect the AL Code
-
The page source file opens (for example CustomerList.al)
-
Scroll through the AL code
-
Fields shown in Page Inspection match field() definitions
At this stage, you are inspecting the structure, not modifying live data.
What Actually Opens in Visual Studio Code?
When VS Code launches, Business Central automatically:
-
Creates a temporary AL project
-
Generates app.json and launch.json
-
Downloads symbols or source code (based on permissions)
-
Connects to the correct environment
Key Files Explained
|
File |
Purpose |
|
app.json |
Extension identity and metadata |
|
launch.json |
Extension identity and metadata |
Production Debugging: What You Should Know
Yes, debugging production sessions is possible, but it is controlled.
-
You can attach a debugger to a live session
-
Source code visibility depends on resourceExposurePolicy
-
If source is restricted, only symbols are available
-
This prevents unauthorized access to proprietary code
Microsoft designed this to balance power with security.
Common Use Cases for This Feature
-
Investigating unexpected page behavior
-
Verifying which fields are used by extensions
-
Troubleshooting performance issues
-
Understanding third-party extension logic
-
Learning AL structure from real objects
Visual Workflow Overview
|
Step |
Action |
|
Web Client |
Open page and inspect |
|
Page Inspector |
View metadata |
|
VS Code |
Open AL project |
|
Symbols |
Download objects |
|
Debugger |
Attach to session |
This flow removes guesswork and speeds up analysis.
Common Issues and Fixes
VS Code does not open
-
Check AL Language extension
-
Verify VS Code installation
-
Confirm browser permissions
Source code not visible
-
Extension does not allow source exposure
-
You will receive symbols only
Debugger not attaching
-
Environment mismatch
-
Incorrect launch.json values
Why This Feature Matters for Business Central Teams
Extension investigation is no longer limited to senior developers. Microsoft has made it accessible, structured, and safer for broader teams. This improves collaboration between development, functional, and support roles while reducing resolution time.
FAQs
Q. What are the prerequisites for opening VS Code from Business Central?
You need VS Code, AL Language extension, correct permissions, and access to the environment.
Q. Can I debug production environments?
Yes, but access is restricted and controlled by extension policies.
Q. Why do I only see symbols instead of code?
The extension owner has restricted source exposure.
Q. Does this work with cloud sandboxes?
Yes, sandbox is the recommended environment for investigation.
Final Thoughts
Opening Visual Studio Code from the D365 Business Central web client makes extension investigation faster and more practical. It allows teams to move directly from the user interface to AL code, symbols, and debugging tools without breaking workflow.
Used correctly, this feature helps developers, consultants, and support teams understand extensions, trace issues, and work confidently across sandbox and production environments.
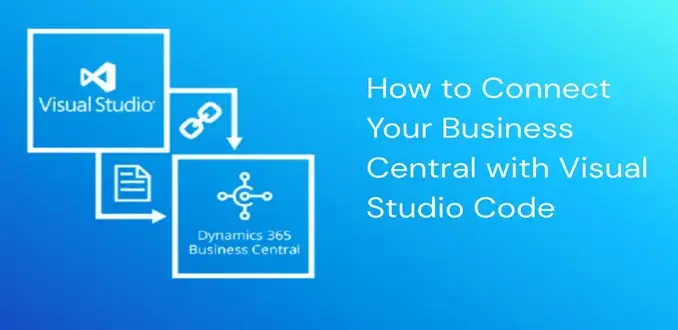
How to Connect Your Business Central with Visual Studio Code
Welcome to our next class on Dynamics 365 Business Central. Today we will learn how to connect Business Central with Visual Studio Code so you can begin developing and customizing extensions using AL language. This lesson is written for developers at all skill levels including beginners, junior developers, system administrators, and learners who want to work with Business Central in a structured development environment using the latest Microsoft development workflow recommended for 2026 and beyond. We will explore the official Microsoft setup steps, including installing the essential AL Language extension, setting up your launch.json and app.json files, and running your first AL code inside Business Central. By the end of this lesson you will also understand how modern AI tools can be used to increase your productivity in AL development.
Before we begin, many businesses ask why this setup is important. In real development projects, you will write AL code inside Visual Studio Code to create custom pages, tables, extensions, fields, and automation workflows. This is the foundation of Business Central development and the starting point of every Dynamics 365 BC project.
If your organization needs help with sandbox configurations, app deployment, or full feature development, our Microsoft Dynamics 365 Solutions team at Out2Sol Global provides complete support from installation to project publishing.
Watch Our Out2Sol Short and Quick Youtube Video
We always start this class by asking our students to watch a short tutorial video.
Here is the same video we used in our training session
Watching it once will make the step-by-step process below easy to follow.
Steps to Connect Visual Studio Code with Business Central
Below are the steps in the same teaching style used in a classroom. Each step is short and clear.
Step 1 Download Visual Studio Code
-
Install Visual Studio Code on your computer
-
Open Visual Studio Code and wait until it loads fully
-
This editor becomes your main workspace for AL development
Step 2 Install AL Language Extension
-
Open the Extensions view in Visual Studio Code
-
Search for the AL Language extension
-
Install the AL Language extension for Microsoft Dynamics 365 Business Central
-
This extension prepares Visual Studio Code for AL coding
Step 3 Open Command Palette
-
Select View inside Visual Studio Code
-
Click Command Palette
-
You will use Command Palette often for AL commands
Step 4 Select AL Go
-
Type AL Go inside the Command Palette
-
Choose AL Go to create a new AL project
-
Visual Studio Code generates a starter folder with sample files
Step 5 Select your wave
-
Choose the wave that matches your Business Central environment
-
In class we select Wave 2
-
Select the same wave used by your sandbox for correct compatibility
Step 6 Choose server
-
You may choose your own server
-
You may choose Microsoft cloud sandbox
-
Learners usually work with cloud sandbox because it is pre configured and stable
Step 7 Copy application ID or URL
-
Open your Business Central application
-
Copy the application ID or URL
-
You will use this value in your project configuration later
Step 8 Edit launch json
-
Open launch json inside the AL project
-
Update these fields
-
name
-
tenant
-
environmentType
-
environmentName
-
startupCompany
-
-
These values guide Visual Studio Code to your Business Central environment
Step 9 Download symbols
-
Open Command Palette again
-
Search for the symbols option
-
Select the command to download symbols from Business Central
-
Symbols allow Visual Studio Code to read pages tables fields and other base objects
Step 10 Update app json
-
Open app json inside your AL project
-
Update the id field
-
Update the name field
-
Update the publisher field
-
These fields identify your extension inside Business Central
Step 11 Copy the sign in link
-
Visual Studio Code shows a link after symbols download
-
Copy the link
-
Open it in your browser
Step 12 Enter the verification code
-
A Microsoft page opens
-
Enter the code that appears inside Visual Studio Code
-
Select next to continue
Step 13 Sign in to Business Central
-
Sign in using your Business Central account
-
Authentication completes when your credentials match the environment
-
This process connects your AL workspace to the server
Step 14 Confirm the developer connection
-
A confirmation page tells you that your developer application is connected
-
Close the page and return to Visual Studio Code
Step 15 Edit the Hello World file
-
Open the HelloWorld al file
-
Change the message from Hello world to Hello to all of Youtube
-
This is your first custom AL message
Step 16 Run without debugging
-
Select Run without debugging
-
The project compiles and publishes to your Business Central sandbox
-
Visual Studio Code opens the Business Central web client when the publish completes
Step 17 View your message inside Business Central
-
A pop up message appears
-
The message displays Hello to all of Youtube
-
Select ok
Step 18 Check your extension list
-
Open the Extensions page inside Business Central
-
Your extension appears in the list
-
This confirms that Business Central is connected to Visual Studio Code successfully
Using AI Tools with Business Central Development in Visual Studio Code
As development practices evolve, 2026 brings new ways to build and maintain Business Central solutions more efficiently. Once you have connected Visual Studio Code with your Business Central sandbox and downloaded the required symbols, developers can enhance their workflow using AI-enabled tools that integrate directly into VS Code. These tools are designed to assist you with code suggestions, patterns, and project navigation, making AL development faster and less error-prone.
Here are the key AI-enabled tools commonly used in 2026:
GitHub Copilot Integration
GitHub Copilot can be added to VS Code to provide real-time code suggestions and completions while you write AL code. It learns from context and suggests object definitions, function structures, and even comments based on your current workflow. It requires a GitHub Copilot subscription and is best used by developers who understand core AL syntax and Business Central architecture.
AI-Assisted Extensions for Code Recommendations
Several extensions built on AI models can scan your AL files and suggest improvements, refactoring opportunities, or help you catch potential issues early. These tools work alongside the AL Language extension from Microsoft and do not replace your expertise. Instead they act as a smarter guide that helps you avoid common mistakes.
Microsoft Foundry and Model Integration
For advanced scenarios, developers can integrate AI models through Microsoft Foundry or related AI platforms to automate certain parts of their development or testing workflows. These models can assist in generating boilerplate code, offering test suggestions, or preparing documentation based on your project files.
Accessing AI Tools Within the VS Code Workflow
All AI enhancements are made available through the Command Palette (Ctrl + Shift + P) or dedicated sidebars within Visual Studio Code. After you set up your project using the steps earlier in this class (refer to the setup steps), you can invoke AI-related commands alongside traditional AL commands like AL: Go! or Download Symbols.
Why This Matters in 2026
The integration of AI tools into the Business Central development cycle means:
• You spend less time on repetitive tasks
• You reduce syntax and structural errors
• You gain contextual code guidance
• You can focus more on business logic and customization
AI tools do not replace developer expertise but improve efficiency. Using AI appropriately allows you to produce higher-quality AL code and maintain Business Central solutions more effectively in 2026.
Important Notes for Learners
These files are used in every AL project
-
launch json
-
app json
Launch json controls
-
tenant
-
environment type
-
sandbox name
-
startup company
App json controls
-
extension id
-
extension name
-
publisher name
Symbols help Visual Studio Code recognise
-
standard tables
-
standard pages
-
fields
-
base application objects
If symbols do not download the environment and Visual Studio Code cannot work together.
Visual Studio Code Business Central Setup Advice
Learners commonly face setup interruptions during the first attempt. You can avoid many issues with a steady approach.
-
Always use the correct wave version
-
Keep your tenant value accurate
-
Use a stable internet connection
-
Use the AL extension version that matches your Business Central build
-
If you use a sandbox created recently wait for a few minutes before downloading symbols
-
Never copy values from another student because tenant values must match your own account
Troubleshooting Common Issues
Here are frequent issues students face in labs.
Symbols do not download
-
Wave does not match server version
-
Sandbox version recently updated
-
Tenant value incorrect
-
AL Language extension not updated
Publishing fails
-
Incorrect environment type in launch json
-
Outdated AL extension
-
Incomplete authentication
Login issues
-
Wrong account
-
Multi factor prompt not completed
-
Cached credentials expired
Why This Setup Matters
A working Visual Studio Code and Business Central connection supports practical development. All AL code is created and tested inside this environment. You use it for
-
pages
-
tables
-
fields
-
automation steps
-
small extensions
-
custom calculations
This early setup builds the confidence needed for advanced tasks. A clean sandbox environment helps learners experiment safely before touching live data.
Final Notes for Students
After completing this lesson try these small tasks to build confidence
-
create a second AL project with a new name
-
change the message text in each project
-
test symbol download again
-
explore the objects inside the base application through Visual Studio Code
-
publish your project again and observe the change in the Extensions list
Using these tasks your learning path becomes clear. Learners continue to grow through consistent practice. For teams working with Microsoft Dynamics 365 solutions this foundation prepares the structure needed for future customisation work.

How to Open New Accounting Period in D365 Business Central
Welcome to our next class on D365 Business Central. We will walk through how to open new accounting period in Business Central in a clear step by step method. We will also watch a short and quick tutorial video, from which you can use while following these steps for hands on practice. This lesson is designed for accountants’ bookkeepers and system administrators who manage financial periods and reporting period setup in Business Central.
For expert support consider our Microsoft Dynamics 365 Services and Solutions to streamline your setup and ensure best practices.
In this lesson we explain how to open new accounting period and we show how the creation of accounting period affects reporting period filters and financial reports also tips and tricks, closing period, common issues & their solutions and in the last practical exercise for our students.
Why Opening Accounting Periods Matters for Your Company
Before we start the practical steps let us agree why you should open new accounting period in a timely and correct way. Accounting period setup determines the date ranges that Business Central uses for reporting period filters and for closing revenue balances at year end. If accounting periods are not created correctly financial reports may show incorrect results and some closing tasks will not work as expected.
Opening a reporting period on time also reduces manual adjustments speeds up month end closing and improves the reliability of management reports. When periods are defined clearly teams processing invoices and reconciliations know exactly which period to post to and this supports smooth month end workflows.
Quick Overview of The Screens and Tools We Will Use
We will use the Accounting Periods page inside Business Central and the Process actions available there. The main actions you will use are Create Year Close Year and if needed Reopen Fiscal Period. You can create periods in bulk with Create Year or create them manually when the periods follow a non-standard pattern.
Step By Step Guide to Open New Accounting Period in D365 Business Central
Follow these steps while watching your tutorial video. I will list each step and then add teacher notes and tips for each step so you learn not only what to do but why to do it.
Quick and Short Video of How to Open New Accounting Period in D365 Business Central
Read Quick and Easy Steps
- Step 1. > Use the Tell Me search feature and search for Accounting Periods then open the Accounting Periods page
Teacher note: I have found using the Tell Me search is fastest for new users. Type Accounting Periods in the search box and click the page link that appears. - Step 2. > Review existing periods on the Accounting Periods page
Teacher note: Check the latest fiscal year listed the last created period and whether any periods are Closed or Date Locked. This helps you avoid overlaps or accidental changes to closed periods. If you already have an open fiscal year confirm its end date to plan the next year start date. - Step 3. > Decide whether to create the year in bulk or create periods manually
Teacher note: Use Create Year when you want a standard set of periods such as 12 monthly periods. Choose manual creation if you need irregular period lengths such as a 4 4 5 retail calendar. Business Central supports both methods. - Step 4. > If using Create Year choose Process then Create Year and fill the fields Starting Date No of Periods and Period Length then press OK
Teacher notes: for a standard calendar fiscal year set Starting Date to the first date of the year and No of Periods to 12 and Period Length to 1M. The system will generate the full set of periods automatically which saves time and reduces errors. - Step 5. > If creating periods manually choose New and enter each period starting date and mark New Fiscal Year for the first period of the year then repeat for remaining periods
Teacher note: Manual creation is useful when your periods differ in length. When you set New Fiscal Year on the first period Business Central knows this is the year boundary and will use it in closing procedures. - Step 6. > Verify the Created periods appear with correct start dates names and fiscal year flags
Teacher note: Names default to month names but you can change names if needed for clarity. Confirm there are no gaps or overlaps between periods. For example, ensure one period ends the day before the next period start date. - Step 7. > For reporting locked periods set Date Locked or Closed where required after review with finance owners
Teacher Note: Use Date Locked to prevent changing starting dates and closed to indicate the period is shut for postings. Always coordinate with accounting owners before locking or closing periods. Closed periods cannot be reopened without using the Reopen Fiscal Period action and you should understand the implications before closing. - Step 8. > Run a quick posting test in a sandbox or test company to confirm reporting filters behave as expected
Teacher note: Post a small test entry in the new period and run a simple report or ledger inquiry to confirm Business Central recognizes the posting in that reporting period. This reduces surprises during month end.
Helpful Teacher Tips and Tricks for A Smoother Process
- Tip 1: Keep a consistent naming and starting date convention for all fiscal years. Consistency reduces confusion and makes it easier to write column definitions in financial reports that rely on accounting period setup.
- Tip 2: Use Create Year for standard months to save time. If your company uses standard months Create Year creates all periods in seconds and avoids manual entry errors.
- Tip 3: Maintain at least one open fiscal year at all times. Business Central requires at least one open fiscal year. When you plan to close a year ensure the next year is already created. This prevents system errors when closing and when running reports.
- Tip 4: Use Date Locked with care and communicate changes clearly to posting users. Date Locked prevents changing the start date for a period. Communicate to the team when you will lock dates to avoid blocked transactions.
- Tip 5: Test changes in a sandbox before applying them in production. Always validate period creation and report behavior in a test environment if possible. This protects live data and gives you confidence before updating production.
- Tip 6: Document your period setup steps and keep a short guide inside your internal IT or accounting handbook. A short-documented process helps new staff follow the same method and maintains continuity if a team member is absent.
How To Close a Fiscal Year and The Effects on Reporting Period in Accounting
Closing a fiscal year is part of your period management workflow. On the Accounting Periods page choose Process then Close Year to close the earliest open fiscal year. Closing marks the periods as Closed and Date Locked which prevents further changes and finalizes the year for reporting. Note that after a year is closed you cannot change the starting date of the following year so plan carefully before closing.
Out2Sol Professional notes: If you close a year without creating the next year first you may run into processing issues. Always ensure continuity by creating the next fiscal year before closing the current one.
How To Reopen Fiscal Periods If Required
There are situations when you may need to reopen a period for adjustments. Business Central provides a Reopen Fiscal Period action that reopens the last closed fiscal period. Use this action with full awareness of the consequences and communicate with auditors and finance owners. Reopening should be a controlled process with approvals and audit notes.
Practical Classroom Exercise I Have for You
Exercise 1: Follow the video and perform these tasks in a sandbox environment.
- Create a new fiscal year using Create Year set Starting Date to the first date of your next fiscal year No of Periods to 12 Period Length to 1M and press OK.
- Post a small journal entry dated inside one of the new periods and run a balance inquiry to confirm reporting filters pick up the posting.
- Mark the first period Date Locked and try to change the Starting Date to see the protection in action then undo the change.
Exercise 2: Manual setup exercise for irregular calendars.
- Create three periods manually with different lengths and confirm Business Central accepts the non-standard setup.
- Run a sample financial report that uses column definitions by accounting period and verify output matches the expected date ranges.
Common Issues and How to Solve Them
Issue Users cannot create a new year because an earlier year is still open or conflicting dates exist
Fix Check the Accounting Periods page for overlapping dates and either create the next year or close the earlier year after ensuring the next year exists.
Issue Postings are not appearing in reports after creating periods
Fix Confirm the posted entries are within the start and end dates of the new accounting period and that the report column definitions are configured to use accounting period filters. Run a test posting and confirm with a ledger inquiry.
Issue Reopening a period is blocked or warns of consequences
Fix Use Reopen Fiscal Period only after obtaining approvals and check which periods were closed most recently to reopen the correct one. Document the reason for reopening for audit purposes.
How This Lesson Ties to Your Reporting and Month End Tasks
When you open new accounting period in Business Central and keep periods accurate your reporting period in accounting becomes reliable. Column definitions in financial reports depend on accounting periods and comparisons between periods use the same period definitions. Correct period setup simplifies variance analysis and shortens time to close month end.
Closing Course and Next Steps
Welcome to the end of class. We have learned how to create and open new accounting period in D365 Business Central using both the Create Year batch job and manual creation. I recommend you practice these steps in a sandbox environment watch our New Accounting Period Open 2025 video and then perform the exercises I provided.
Key Takeaways
- Creating new accounting periods correctly is essential for accurate reporting and smoother month end close.
- Use the Create Year process when you have standard monthly periods to save time and avoid errors.
- Manual period creation is useful for non-standard calendars and gives full control over dates and fiscal year flags.
- Always test period creation in a sandbox and validate reports with a small test posting.
- Keep a documented checklist and coordinate with finance owners before locking closing or reopening periods.
Disclaimer: All logos, trademarks, and brand names used in this document are the property of their respective owners. Their use here is for identification purposes only and does not imply endorsement.
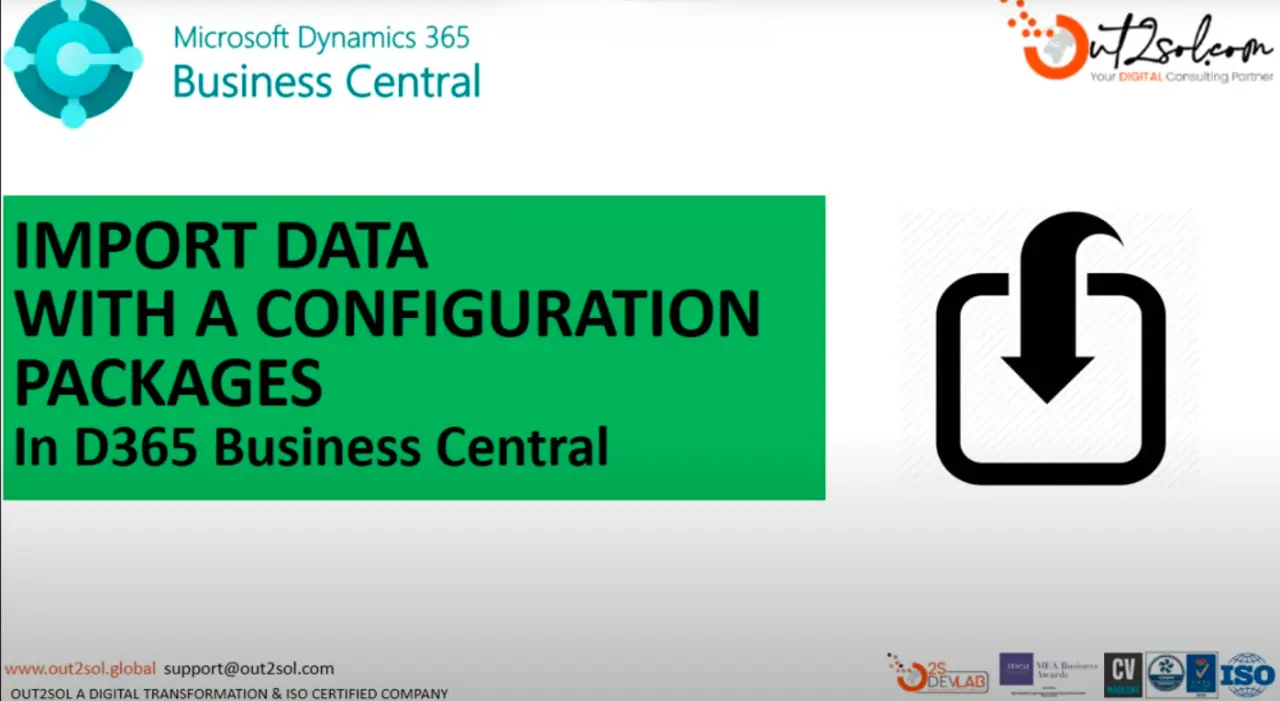
How to Import Data Using Configuration Packages in D365 Business Central
Welcome to our next class on Microsoft Dynamics 365 Business Central. Today, we will explore one of the most useful tools for data migration and setup, how to import data using business central configuration packages.
In this class, we'll walk through each step carefully so that you can easily understand how to manage, edit, and apply imported data in Business Central. This lesson is especially helpful for accountants, system administrators, and consultants who regularly work with data import tasks in D365.
At Out2Sol, we offer Microsoft Dynamics 365 Services and Solutions designed to streamline your business operations; from D365 implementation and integration to advanced customization and training.
Now, let's get started with our step-by-step guide to importing data using configuration packages in Business Central.
Step-by-Step Guide to Import Data Using Configuration Packages
Watch Our Youtube Video
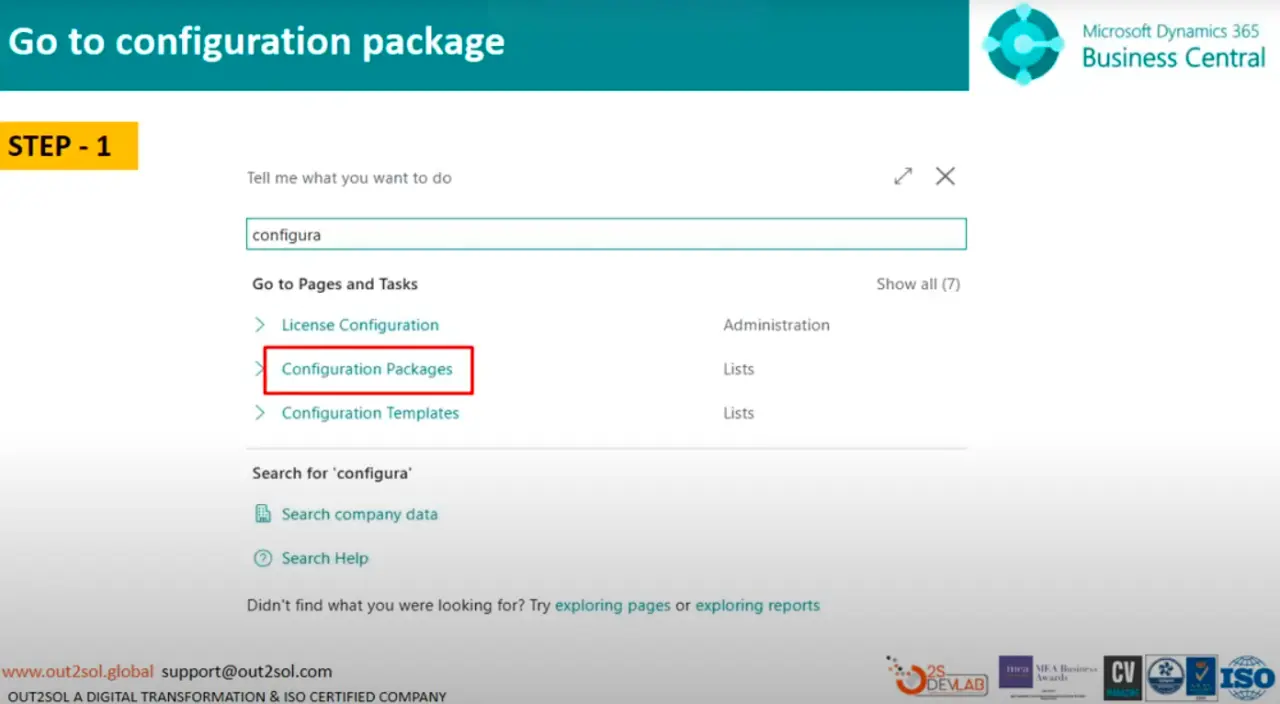
Step 1: Go to Configuration Packages
From the search bar, type Configuration Packages and open the page. This section allows you to create, edit, and manage your data import templates.
Tip: Bookmark this page for quick access in future data import tasks.
Step 2: Create a New Package
Click on New to create a fresh configuration package.
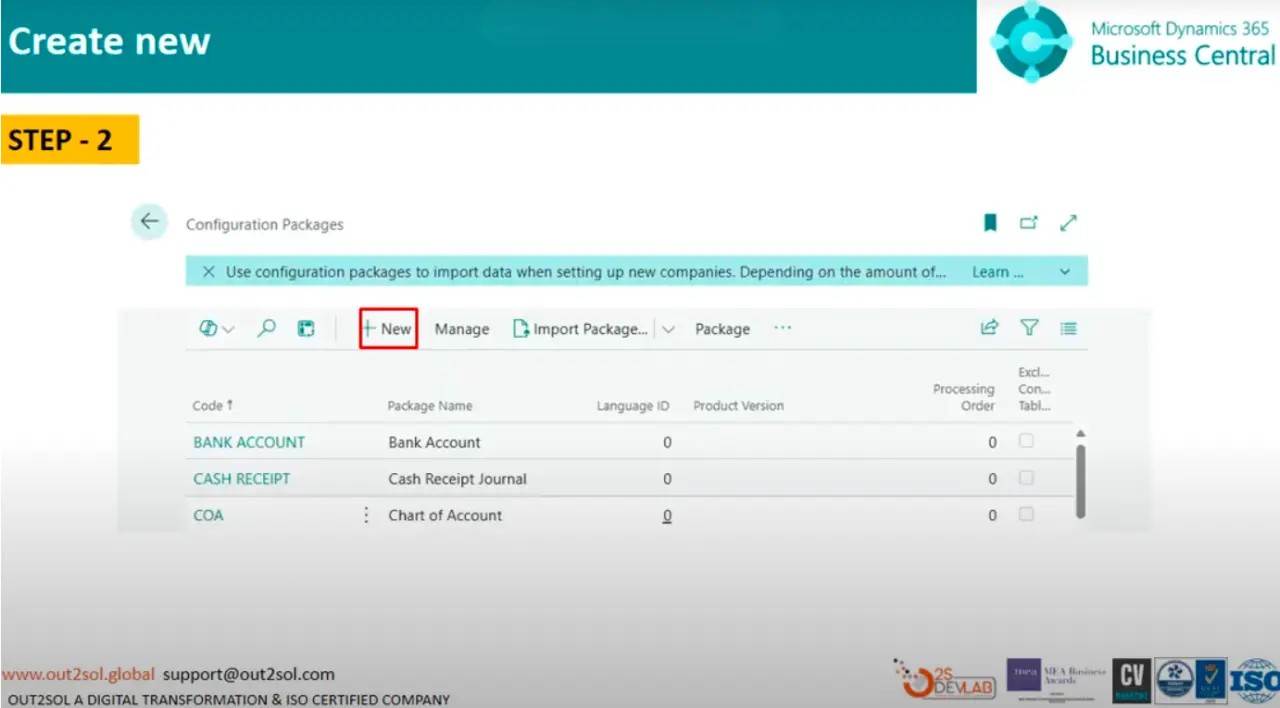
Tip: Always name your packages clearly, for example, Purchase_Invoice_Import_2025, to avoid confusion later.
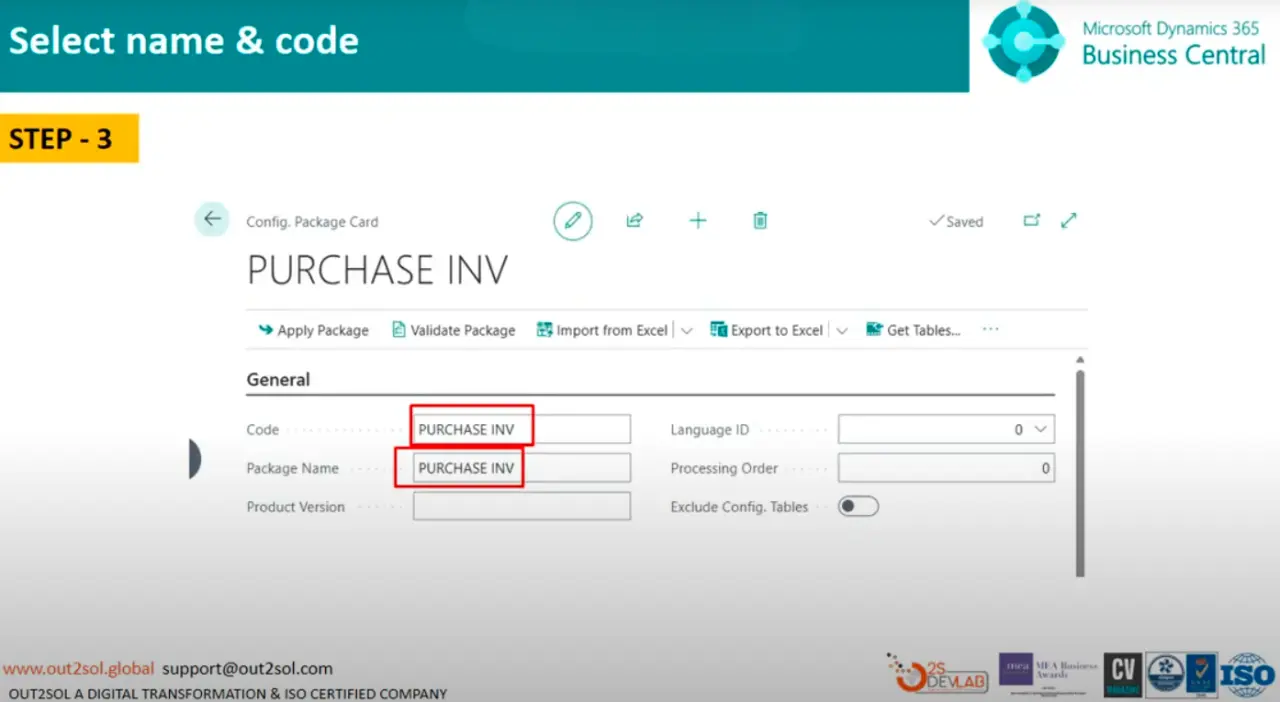
Step 3: Select Code and Package Name
Choose an appropriate Code and Package Name. For this example, we will use Purchase Invoices.
This tells Business Central which area or data type you'll be importing.
Step 4: Select Table ID and Name
In this step, select the Table ID and Table Name.
For our example, choose Purchase Header and Purchase Line.
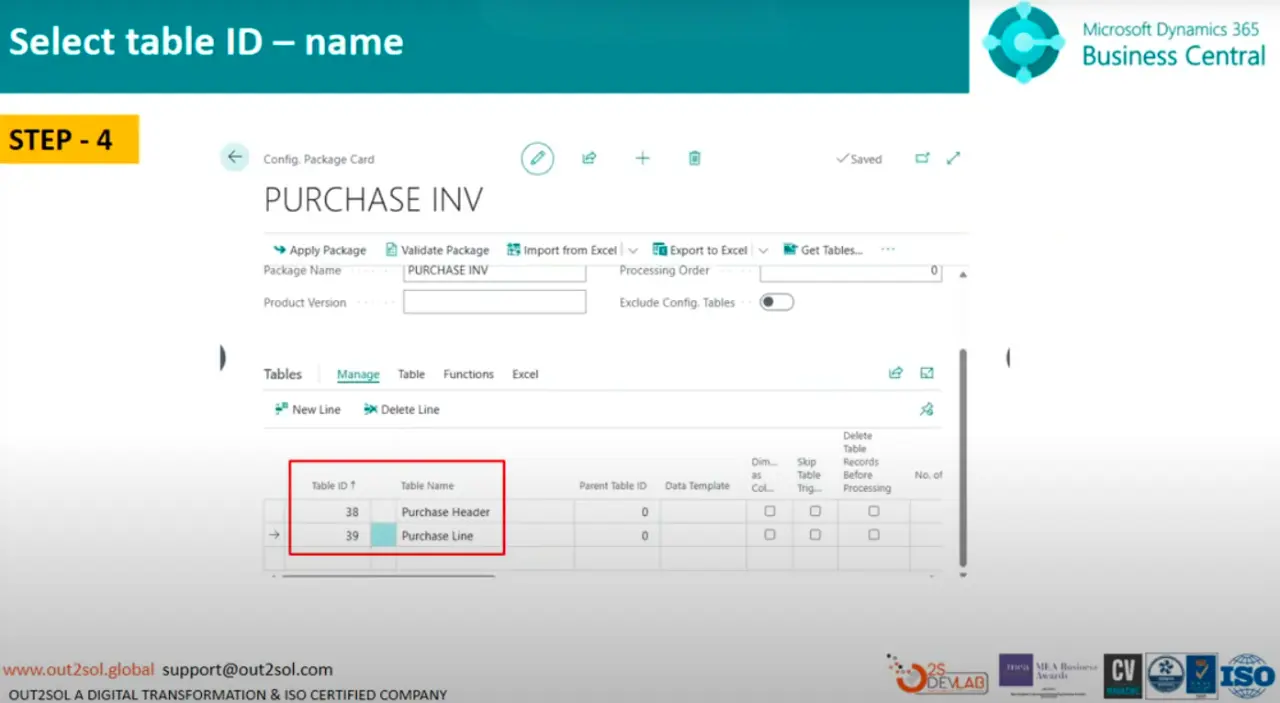
Tip: Always double-check your table selection, incorrect tables may cause import errors or data mismatches.
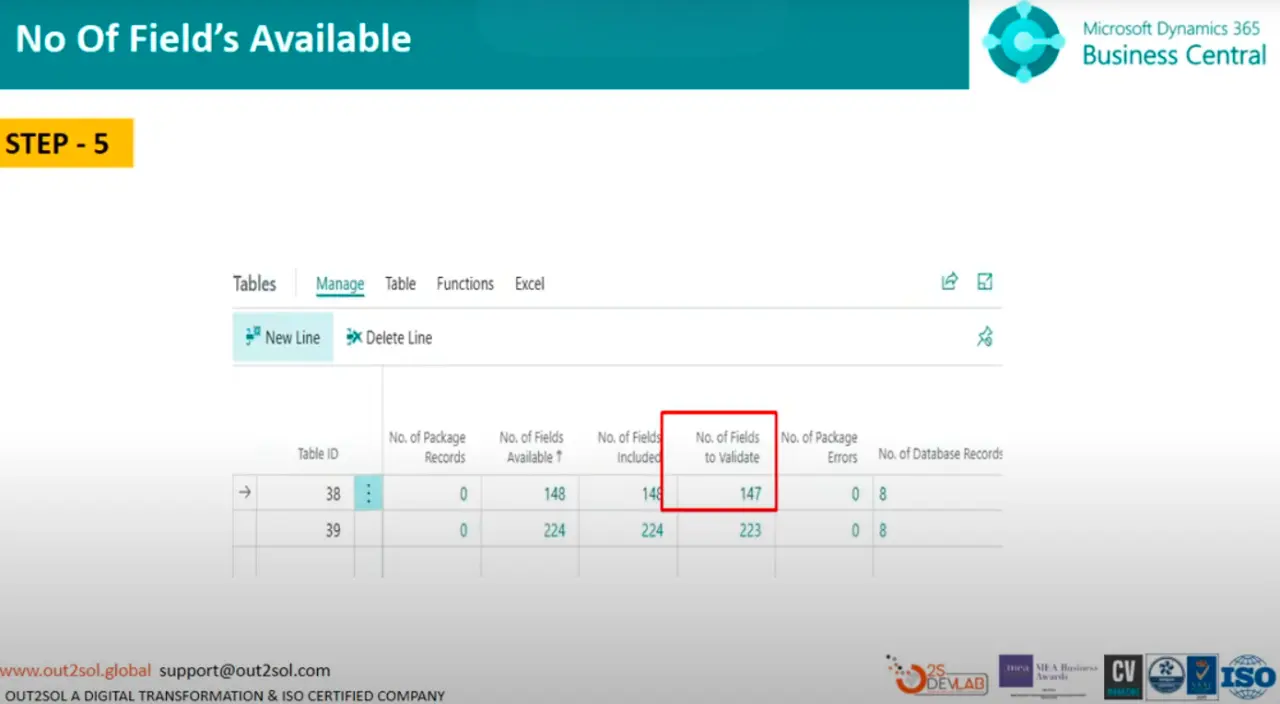
Step 5: Click on Numbers of Fields to Validate
Select No. of Fields to Validate to ensure that the data you're importing matches your table's structure.
This validation step helps prevent data corruption or mapping errors.
Step 6: Select Fields
Click on Fields to review or modify which fields will be included in your import.
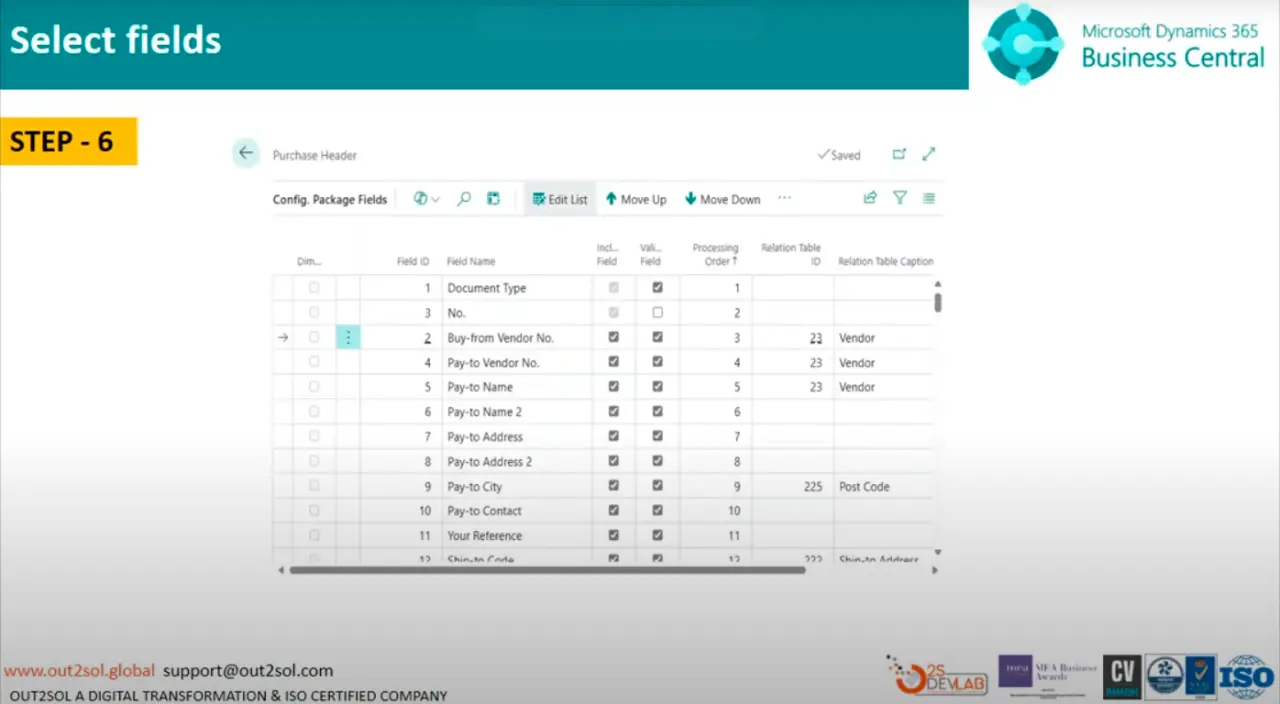
Tip: Import only the necessary fields to keep the data clean and focused.
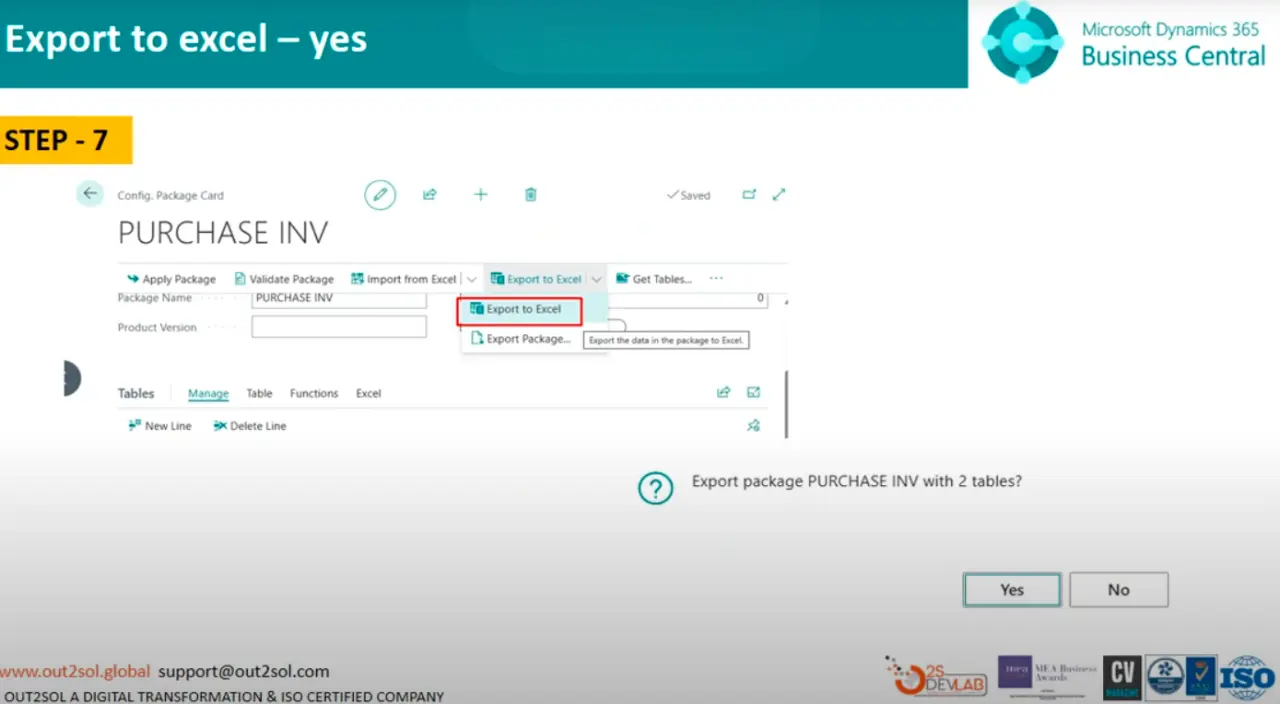
Step 7: Export to Excel
Click Export to Excel. A message will appear:
Export package Purchase Invoice with 2 tables.
Click Yes to proceed.
Business Central will generate an Excel file containing your table structure.
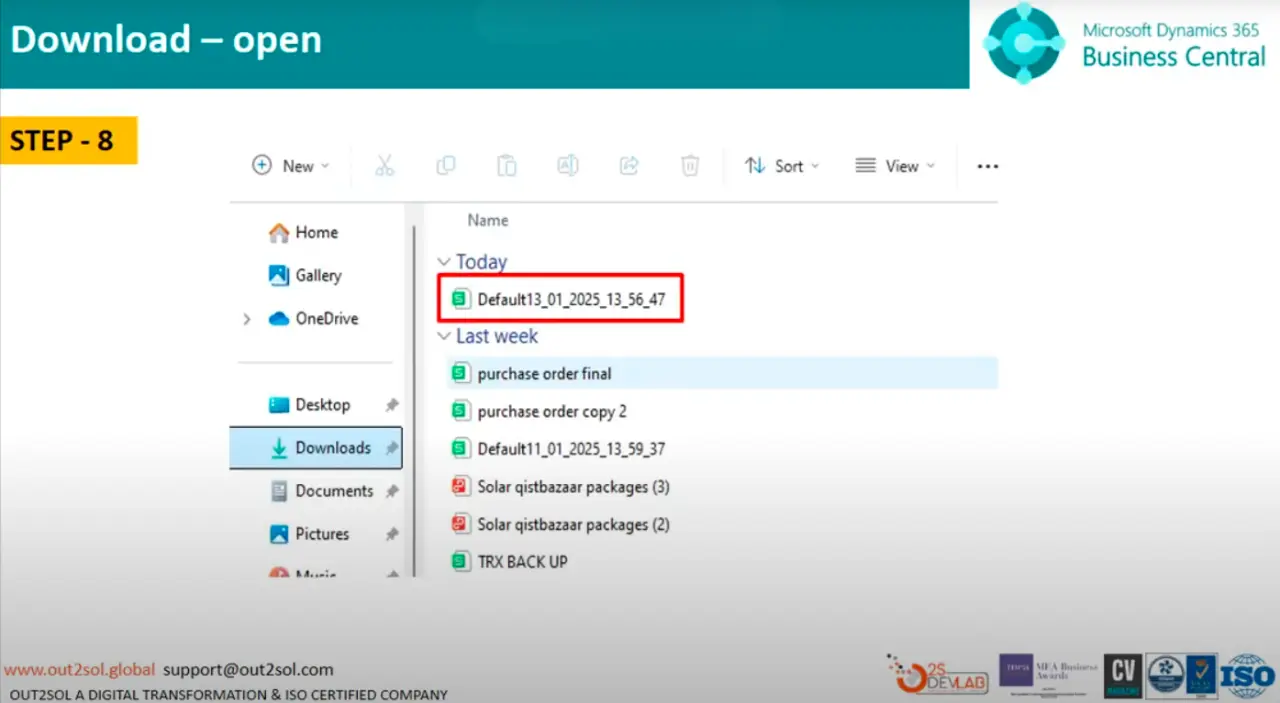
Step 8: Download and Open the Excel File
After downloading, open the Excel file. You'll notice sheets for Purchase Header and Purchase Line — these represent your data structure.
You can now add or modify data in Excel before importing it back into Business Central.
Step 9: Fill Purchase Header and Line Data
Enter the relevant data for your Purchase Header and Purchase Line directly into the Excel file.
Make sure the headers remain unchanged to avoid import issues.
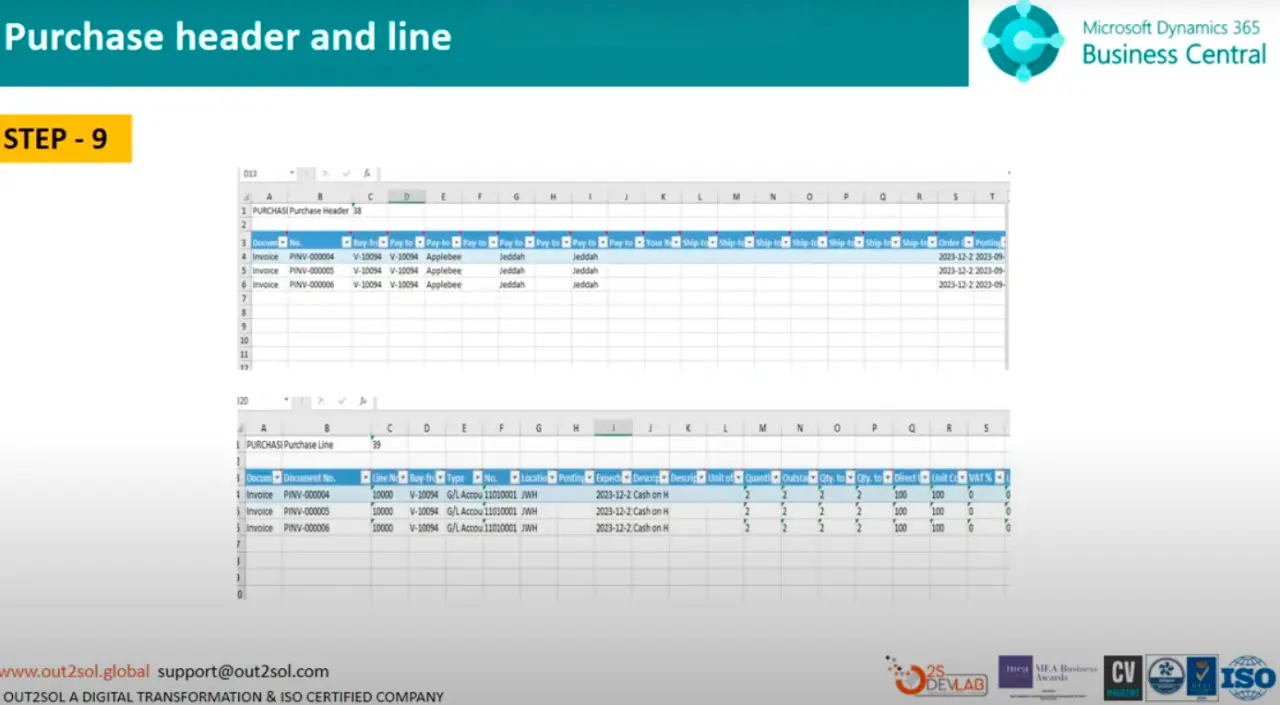
Tip: Keep your data consistent with existing setups (vendor names, item codes, etc.).
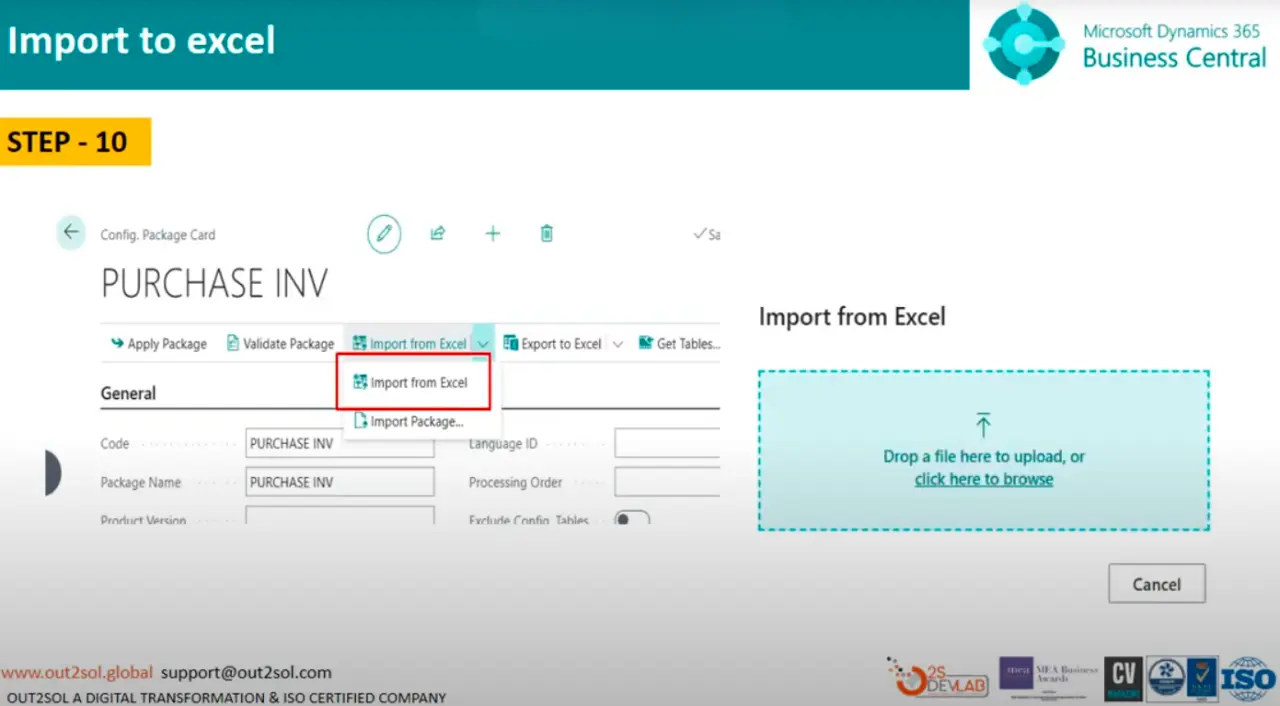
Step 10: Import the File
Once your Excel file is ready, return to Business Central and click on Import from Excel.
Drag and drop your Excel file into the import window.
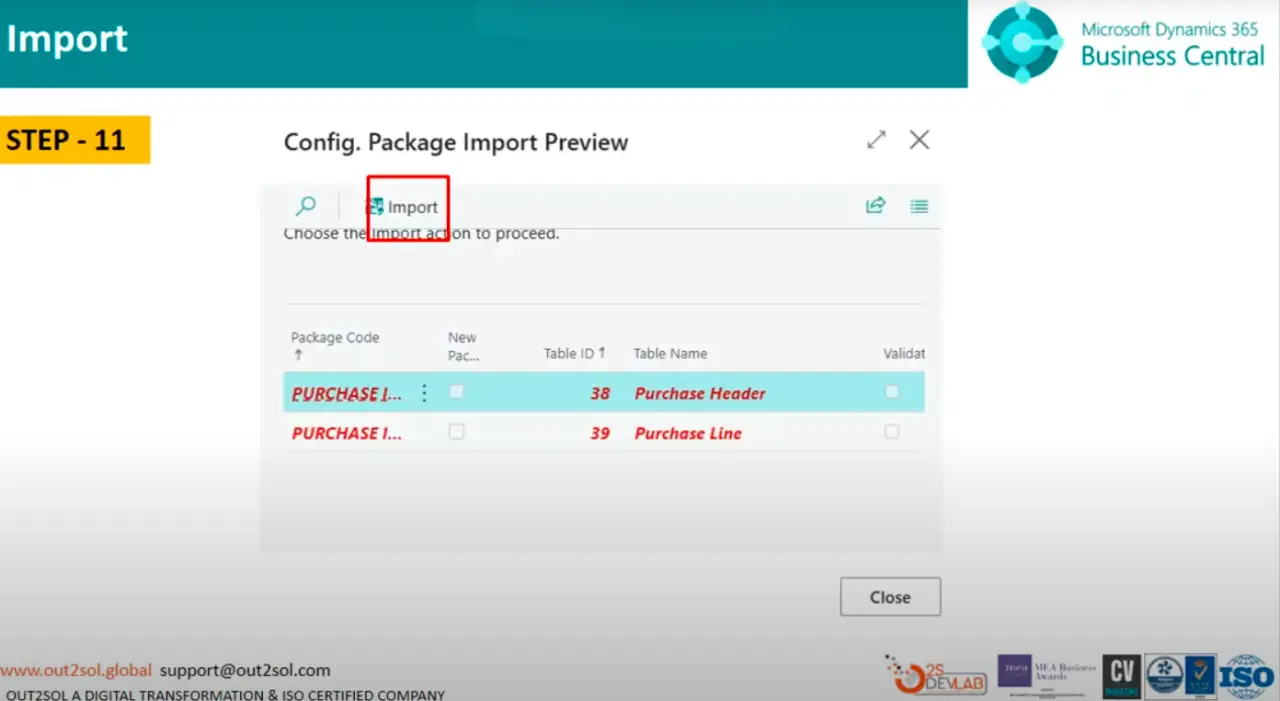
Step 11: Confirm Import
After uploading, click Import. Business Central will process your file and show how many records are ready for application.
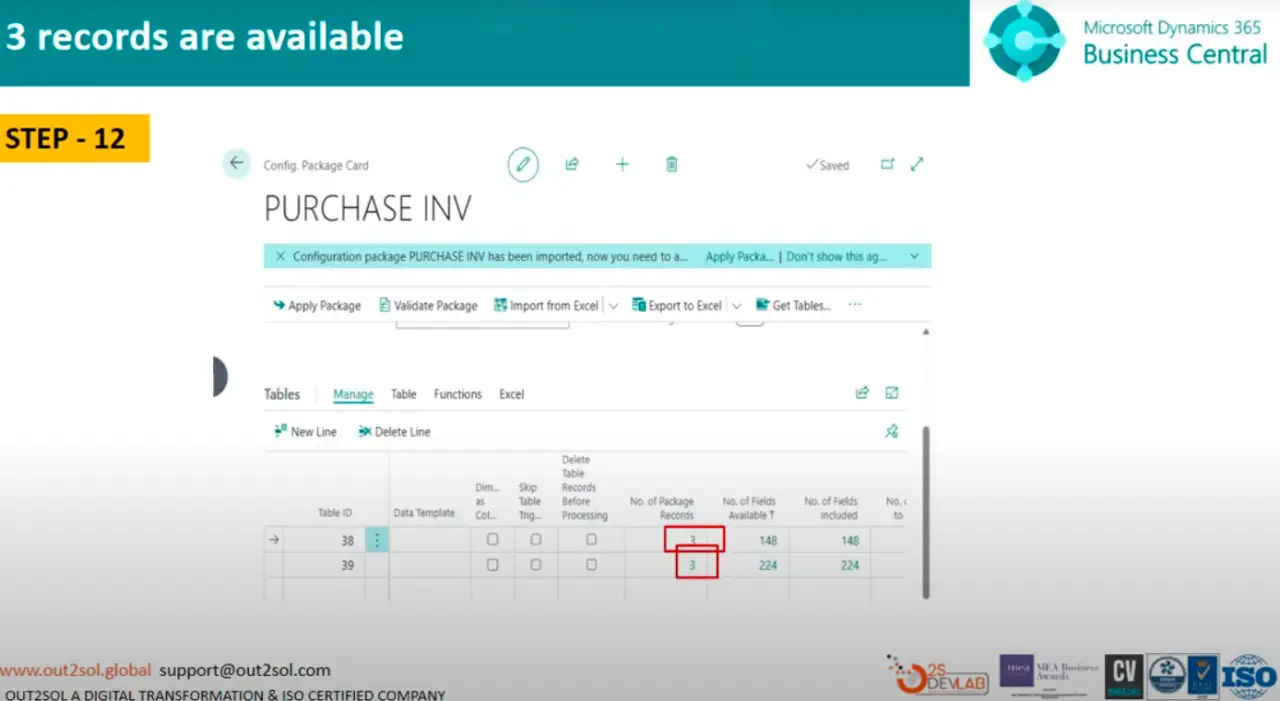
Step 12: Review Imported Records
A message will confirm something like:
3 records are available.
Check the details to ensure your imported data looks correct before applying it.
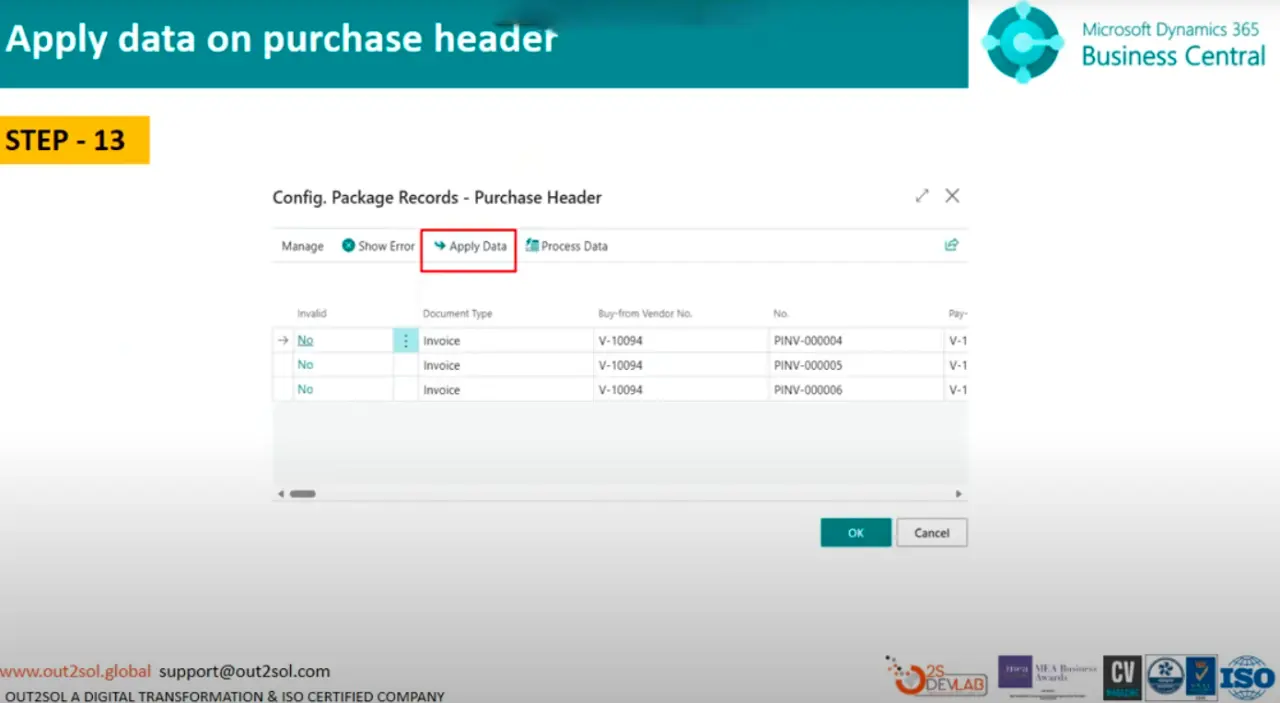
Step 13: Apply Data to Purchase Header
Select Apply Data on the Purchase Header section, then click OK.
This step will map and insert the data into your database.
Step 14: Apply Data to Purchase Line
Repeat the process,select Apply Data for Purchase Line, then click OK.

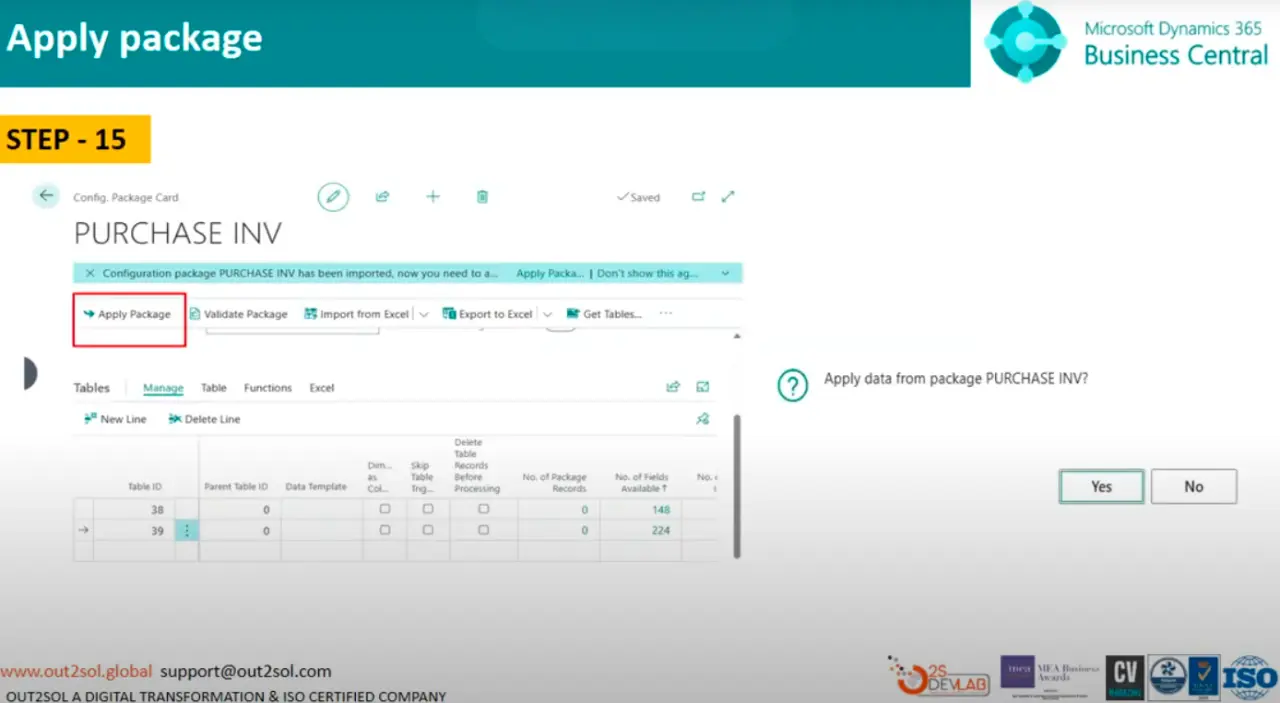
Step 15: Apply the Package
Now click Apply Package.
You'll see a pop-up message:
Apply data from package INV in purchase line.
Click Yes to confirm.
This applies your imported data to the respective tables.
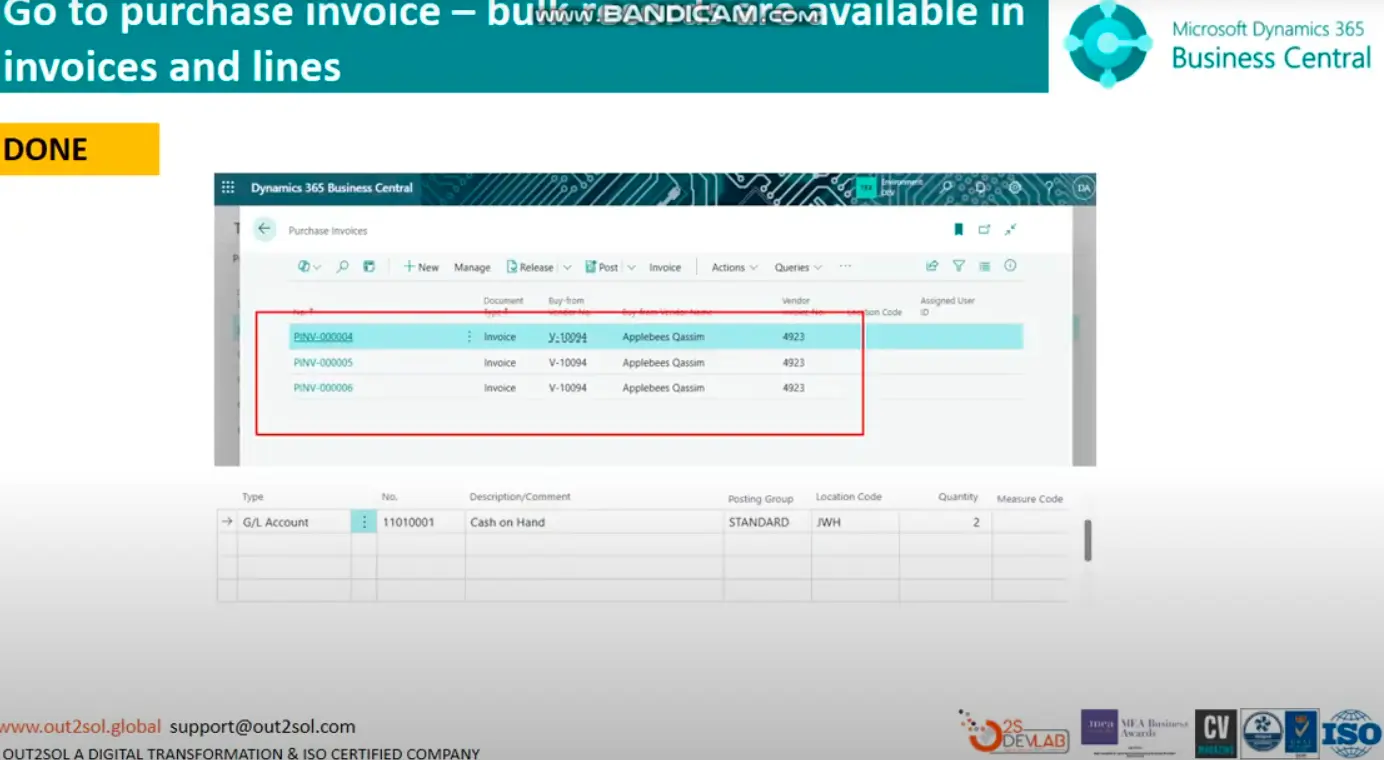
Step 16: Verify the Imported Data
Finally, navigate to Purchase Invoices. You'll see that your bulk records are successfully available in invoices and lines.
Tip: Always review your imported records and run a quick test transaction to confirm the data behaves correctly.
Practical Tips and Tricks
- Backup before import: Always back up your company data before applying packages.
- Use small test packages: Test with 2–3 records before large imports.
- Validate fields first: Use the validation feature to catch mapping errors early.
- Keep Excel clean: Avoid formulas, merged cells, or hidden columns in your Excel sheet.
- Save templates: Reuse configuration packages for recurring imports.
Final Notes
You've now learned how to import data using configuration packages in D365 Business Central, from creating the package to applying it and verifying results.
In our next session, we'll continue exploring How to Connect Your Business Central with Visual Studio. Until then, practice these steps with your sample data and note down any issues you encounter, we'll discuss them together in the next class.
Disclaimer: All logos, trademarks, and brand names used in this document are the property of their respective owners. Their use here is for identification purposes only and does not imply endorsement.
How to Set Up a New Number Series in Dynamics 365 Business Central
In Microsoft Dynamics 365 Business Central, managing number series is one of the most essential tasks for maintaining order and consistency across transactions. Every record in the system, whether it is an invoice, sales order, purchase transaction, or general journal entry, is identified with a unique number. These numbers are generated automatically through number series, making it easier to track and manage business data without duplication or confusion. Companies that implement Microsoft Dynamic 365 solutions often find it easier to automate numbering and reduce errors.
In this training class 2, we will walk through the complete process of creating, setting up, and assigning number series in Business Central.
What is a Number Series in Business Central
A number series in Business Central defines how numbers are assigned to documents and records. Instead of manually entering numbers every time, you can automate the process. This ensures:
- Consistency across different modules
- Control over record sequencing
- Error reduction by avoiding duplicates
- Flexibility for different departments such as finance, sales, and purchasing
For example, a No. Series in Dynamics 365 Business Central might start with INV-10001 for invoices and PO-20001 for purchase orders.
Steps to Create a New Number Series in Business Central
Here’s a detailed, step-by-step process to set up a new number series in Dynamics 365 Business Central:
1. Open the No. Series Page
- In the search bar, type No. Series, then select the No. Series page.
- You will see the list of existing number series codes.
2. Click New to Define a Series
- Click on New.
- Enter a Code (this is shorthand like “INV23”, “PO2025”, etc.).
- Enter a Description so that you (and others) know what it is for (e.g. Sales Orders 2025, Purchase Transactions).
3. Define No. Series Lines
- After creating the number series, click Lines (or similar) to open No. Series Lines.
- Set the Starting Number (e.g. INV-10001).
- Optionally set an Ending Number (e.g. INV-99999) if you want a capped range.
- Enter Starting Date if this sequence should start from a specific date.
- Set Increment-by-No. (often 1, so each new record gets the next number).
4. Configure Default vs Manual Numbering
- Turn on Default Nos if you want Business Central to automatically assign the next number.
- If you need to allow users to override or manually enter numbers (for special cases), enable Manual Nos.
5. Save and Close
Here is a detailed video guide that visually explains the setup process of number series in Dynamics 365 Business Central.
How to Assign a Number Series to Batches and Transactions
Once your number series is created, you must tell Business Central where it should be used. Here’s how:
- For General Journal, Payment Journal, Cash Receipt Journal, open the relevant journal.
- Go to Edit List or batch setup.
- In the No. Series column for the default batch (or other batches), select your newly created number series.
- Now, when new entries are created in that batch, numbers will follow the series.
It applies similarly for sales and purchase transactions (Sales Orders, Purchase Orders, Sales Invoices, etc.) via the relevant setup areas (e.g. Sales & Receivables Setup, Purchases & Payables Setup).
How to Set Up Number Series for EFT Transactions
Electronic Funds Transfer (EFT) transactions often need a separate numbering sequence:
- Open the Bank Account Card for the bank account that performs EFT.
- Fill the EFT Number Series field with your specific EFT code (e.g. “EFT-2025”).
- Make sure this EFT series does not overlap with your regular payment journal series.
- When you generate remittance advice or EFT payments, the system will use this dedicated number series automatically.
Difference Between EFT and Regular Number Series
|
Feature |
Regular Number Series |
EFT Number Series |
|---|---|---|
|
Used for |
Invoices, Journals, Sales / Purchase Transactions |
Electronic payments & EFT entries |
|
Assignment |
Through transaction setup or batch setup |
In Bank Account Card or EFT setup |
|
Overlap |
Usually shared among multiple modules |
Isolated for clean tracking |
|
Visibility |
Always visible in document headers / journals |
Only used when EFT process is invoked |
How to Change a Number Series for Any Master Record
Sometimes, businesses need to update their numbering rules, especially when entering a new financial year. For example, invoice numbers may restart from 10001 each January.
- To change a number series:
- Open the master record setup (e.g., Sales & Receivables Setup).
- Find the field No. Series.
- Replace it with the newly created series (e.g., SALES2025).
Business Central will then automatically generate numbers using the new sequence for all future records.
Common Issues and Best Practices
- Running out of numbers: Ensure your ending number is far enough ahead. Use reminders or warning when numbers approach end.
- Continuous vs Gaps: For financial / audit-critical documents, avoid gaps. For non-critical records (quotes, warehouse docs), gaps may be permissible.
- Manual override: Be careful when allowing manual numbers — ensure uniqueness and avoid duplicates.
- Date order vs number order: If you post out of work date order, Business Central might flag issues if number series line dates conflict.
Visualizing the Number Series Flow
Below is a simple flowchart that explains how number series work in Business Central:
Transaction Created → System Checks Assigned Number Series → Number Generated → Record Saved
This flow ensures that every transaction is automatically linked to the correct numbering rules.
Expanded Detail: No. Series Fields Overview
To help you understand all the settings you might see, here is more detail on fields and what they mean:
|
Field |
What It Does |
Important Notes |
|---|---|---|
|
Code |
The identifier of the number series |
Keep it meaningful (e.g. “SO2025”, “PO_INV”) |
|
Description |
What this series is for |
Helps others know purpose at a glance |
|
Ending No |
Optional limit |
Prevents series overflow |
|
Increment-by-No |
Usually 1 |
Can be higher if skipping numbers (rare) |
|
Manual Nos |
Allows user override |
Turn on only when needed |
|
Default Nos |
Makes BC auto-assign next number |
Good for documents where manual entry is rare |
|
Starting Date |
When this line becomes active |
Helpful if using multiple lines with timeline splits |
Summary
Setting up a number series in Business Central is essential for keeping financial and operational records organized. By creating unique series for invoices, purchase orders, general journals, and EFT transactions, businesses can maintain control and accuracy. With a few simple steps, administrators can create, assign, and update these sequences as business needs evolve.
With Microsoft Dynamic 365 solutions, the process becomes flexible and efficient. From defining a new number sequence to managing exceptions like EFT transactions, Business Central ensures every record is properly numbered.
If you want a hands-on walkthrough, don’t forget to watch our training video on Set Up a New Number Series in Dynamics 365 Business Central. This is the second lesson in our Microsoft Dynamics 365 training series, so stay tuned for the next session.
Disclaimer: All logos, trademarks, and brand names used in this document are the property of their respective owners. Their use here is for identification purposes only and does not imply endorsement.
%20in%20D365%20Business%20Central.webp)
How to Setup Multifactor Authentication (MFA) in D365 Business Central
Security in today’s digital environment is no longer optional; it is a necessity. Many organizations rely on Microsoft Dynamic 365 solutions to manage their operations, finance, and customer data, which makes protecting these systems a top priority. One of the most reliable ways to safeguard access is by enabling Multifactor Authentication in D365 Business Central. This blog will guide you step by step on how to set up MFA, explain the different authentication methods available, and show why it is essential for every business.
Why You Must Use Multifactor Authentication to Access Business Central
Traditional password protection is no longer enough. Cyber attackers use advanced methods to crack weak or reused passwords, and even the strongest credentials can be compromised through phishing or brute-force attacks. This is where MFA in D365 Business Central becomes vital.
With Business Central MFA, users are required to provide an additional verification step beyond the standard password. This could be a phone call, text message, or mobile authenticator app notification. Adding this second layer of defense ensures that even if a password is stolen, unauthorized access is nearly impossible.
If you want to see this process visually, check out our detailed walkthrough in this video tutorial.
Multi Factor Authentication Flowchart
The flow of Multi Factor Authentication methods in Business Central can be understood through a simple process:
- User Login Attempt: A user enters their Business Central credentials.
- System Verification: Business Central checks the username and password.
- MFA Trigger: The system prompts the user to verify their identity using an additional method.
- Authentication Method Selection: The user confirms through their chosen method (app, SMS, email, or hardware token).
- Access Granted: If the verification is successful, the user gains access to Business Central.
- This flow ensures that access is not granted until both steps are verified.
Authentication Methods in Business Central MFA
Here’s a simple breakdown of the available authentication methods in Business Central MFA:
|
Authentication Method |
Description |
Best Use Case |
|---|---|---|
|
Microsoft Authenticator App |
Mobile app providing push notifications or codes |
Recommended for most users (balance of security + ease) |
|
SMS or Phone Call |
A code sent to the user’s registered mobile number |
Useful for users without smartphones |
|
Email Verification |
Code delivered via email |
Works as a backup method but less secure |
|
Hardware Security Key |
A physical key used for verification |
Ideal for high-security environments like finance or government |
As a best practice, most organizations prefer the Microsoft Authenticator App for strong protection and smooth usability.
Step-by-Step Setup of Multifactor Authentication in D365 Business Central
Here is a simplified process to configure MFA in D365 Business Central:
- Sign in to Microsoft 365 Admin Center with your administrator account.
- Go to Users > Active Users.
- Select the user accounts that require MFA.
- Click on Manage Multifactor Authentication.
- Enable MFA for the selected accounts.
- On the next login, users will be prompted to configure their preferred authentication method.
- Once completed, MFA will be active for that user in Business Central.
Pro Tip: Roll out MFA in phases—start with high-privileged accounts like admins, then extend it to all employees.
Benefits of Enabling Business Central MFA
- Improved Security: Protects against stolen or hacked credentials.
- Regulatory Compliance: Meets data security standards required in many industries.
- Scalability: Works across enterprises of all sizes, from SMEs to large corporations.
- User Confidence: Employees can work remotely without worrying about account breaches.
Summary
Setting up Multifactor Authentication in D365 Business Central adds an extra security layer beyond passwords and helps protect your company data from unauthorized access. With Microsoft Dynamic 365 solutions, this setup can be done through the admin center where you enable MFA for users, choose the preferred authentication methods, and enforce login policies. Once enabled, users must verify their identity through options like an authenticator app, SMS, or email codes before accessing Business Central. This makes it harder for attackers to gain access, even if a password is compromised.
To follow along with a hands-on demonstration, don’t forget to watch our training video on setting up MFA in Business Central. This will be the first class in our Microsoft Dynamics 365 training series, so stay tuned for more tutorials.
Disclaimer: All logos, trademarks, and brand names used in this document are the property of their respective owners. Their use here is for identification purposes only and does not imply endorsement.


%20-%20Aramco%20SACS%20002%20Assessment%20in%20Depth.webp)


%20in%20Brief.webp)


Your choice regarding cookies on this site
Policy, By Continuing, You are agreeing to Our Terms of Use and Consenting to the above.
Privacy Policy Powered By | ![]()


